AdonisJS
Adonis JS - 3. Migrations, Models, Forms
Updated:
In this section, we will learn all about how to interact with our database using migrations, models, forms, seeds and factories.
Since we are building an application for a library, we need a way to manage books, which means we are going to need a way to store and retrieve books from our database.
Migrations
Migrations are JavaScript files that allow us to create or modify tables in our database. Since we will need a "books" table in our database, we will need to create a migration to create this new table, which we can do by running the following command:
adonis make:migration books
Then select "Create table" from the options presented in your terminal.
This will create a new file in database/migrations/1586779432763_books_schema.
The name of your file will be slightly different.
When we open this file up, we should see the following:
"use strict";

/** @type {import('@adonisjs/lucid/src/Schema')} */
const Schema = use("Schema");

class BooksSchema extends Schema {
  up() {
    this.create("books", (table) => {
      table.increments();
      table.timestamps();
    });
  }

  down() {
    this.drop("books");
  }
}

module.exports = BooksSchema;
This is the migration boilerplate that Adonis generates for us. We now need to describe the various attributes and properties that are associated with our books, which will then be turned into columns in our new "books" table.
The API for various data types can be found here
Each book will have a title, author, cover_image, and ISBN number. To keep things simple for now, the cover_image will be a string that is a URL to a image of the book. Let's update our migration to add these new types.
"use strict";

/** @type {import('@adonisjs/lucid/src/Schema')} */
const Schema = use("Schema");

class BooksSchema extends Schema {
  up() {
    this.create("books", (table) => {
      table.increments();
      table.string("title");
      table.string("author");
      table.string("cover_image");
      table.string("isbn");
      table.timestamps();
    });
  }

  down() {
    this.drop("books");
  }
}

module.exports = BooksSchema;
Now we need to run this migration in order to create our new table.
adonis migration:run
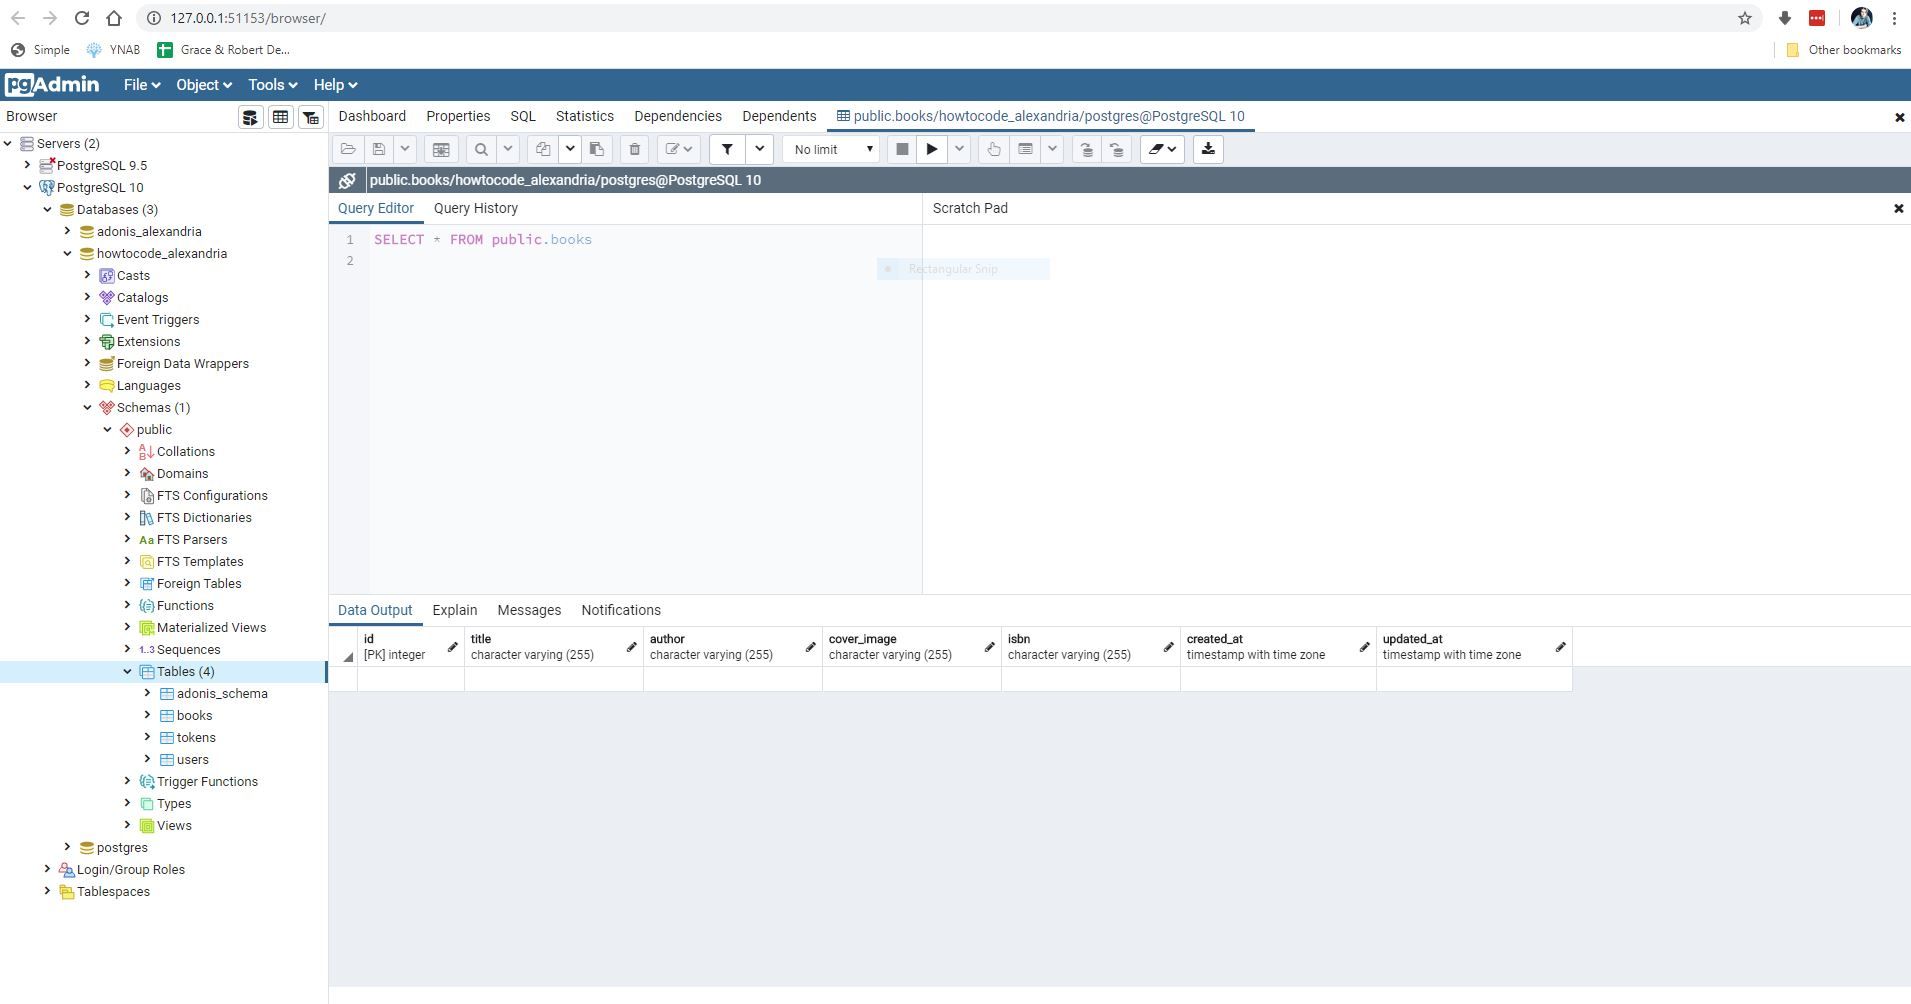
If we inspect our database, we should now see our new table and our new columns.
Models
Now we are going to need to create a Book model so that Adonis can interact with our new table.
adonis make:model Book
This will create a new file in app/Models/Book.js
"use strict";

/** @type {typeof import('@adonisjs/lucid/src/Lucid/Model')} */
const Model = use("Model");

class Book extends Model {}

module.exports = Book;
For now, we do not need to do anything to this file as we have all of the methods we are going to need as our Book model extends the Lucid Model.
Forms
Now that our database and model are setup, we need a way to create our books and add them to our database. Let's create a simple form to create a new book. To do this, we are going to need to create a new view for our form and also the create and store methods on our book controller.
First, we will create our new form with the following command:
adonis make:view book/create
Open up resources/views/book/create.edge and add the following:
@layout('layouts.default')

@section('content')
  <h1>Add a Book</h1>

  <form>
    <div class="form-group">
      <label for="">Title</label>
      <input type="text" name="title" class="form-control">
    </div>

    <div class="form-group">
      <label for="">Author</label>
      <input type="text" name="author" class="form-control">
    </div>

    <div class="form-group">
      <label for="">Cover Image</label>
      <input type="text" name="cover_image" class="form-control" placeholder="image URL">
    </div>

    <div class="form-group">
      <label for="">ISBN</label>
      <input type="text" name="isbn" class="form-control">
    </div>

    <input type="submit" value="Submit" class="btn btn-primary">
  </form>
@endsection
This is just a simple form with various bootstrap classes
Now we need to create a route in order to access our new form. Open up routes.js and add the following Route.get("books/create", "BookController.create");
Your entire routes.js file should look like the following:
"use strict";

/*
    |--------------------------------------------------------------------------
    | Routes
    |--------------------------------------------------------------------------
    |
    | Http routes are entry points to your web application. You can create
    | routes for different URL's and bind Controller actions to them.
    |
    | A complete guide on routing is available here.
    | http://adonisjs.com/docs/4.1/routing
    |
    */

/** @type {typeof import('@adonisjs/framework/src/Route/Manager')} */
const Route = use("Route");

Route.on("/").render("welcome");
Route.get("/books", "BookController.index");
Route.get("books/create", "BookController.create");
Now we need to update our Book controller and add the create method, which will return our create.edge view we made earlier.
"use strict";

class BookController {
  async index({ view }) {
    const books = [
      { title: "Book 1", author: "John Doe" },
      { title: "Book 2", author: "Jane Doe" },
      { title: "Book 3", author: "Adam Smith" },
    ];

    return view.render("book.index", {
      books,
    });
  }

  async create({ view }) {
    return view.render("book.create");
  }
}

module.exports = BookController;
If you open your browser to http://localhost:3333/books/create you should see the following: 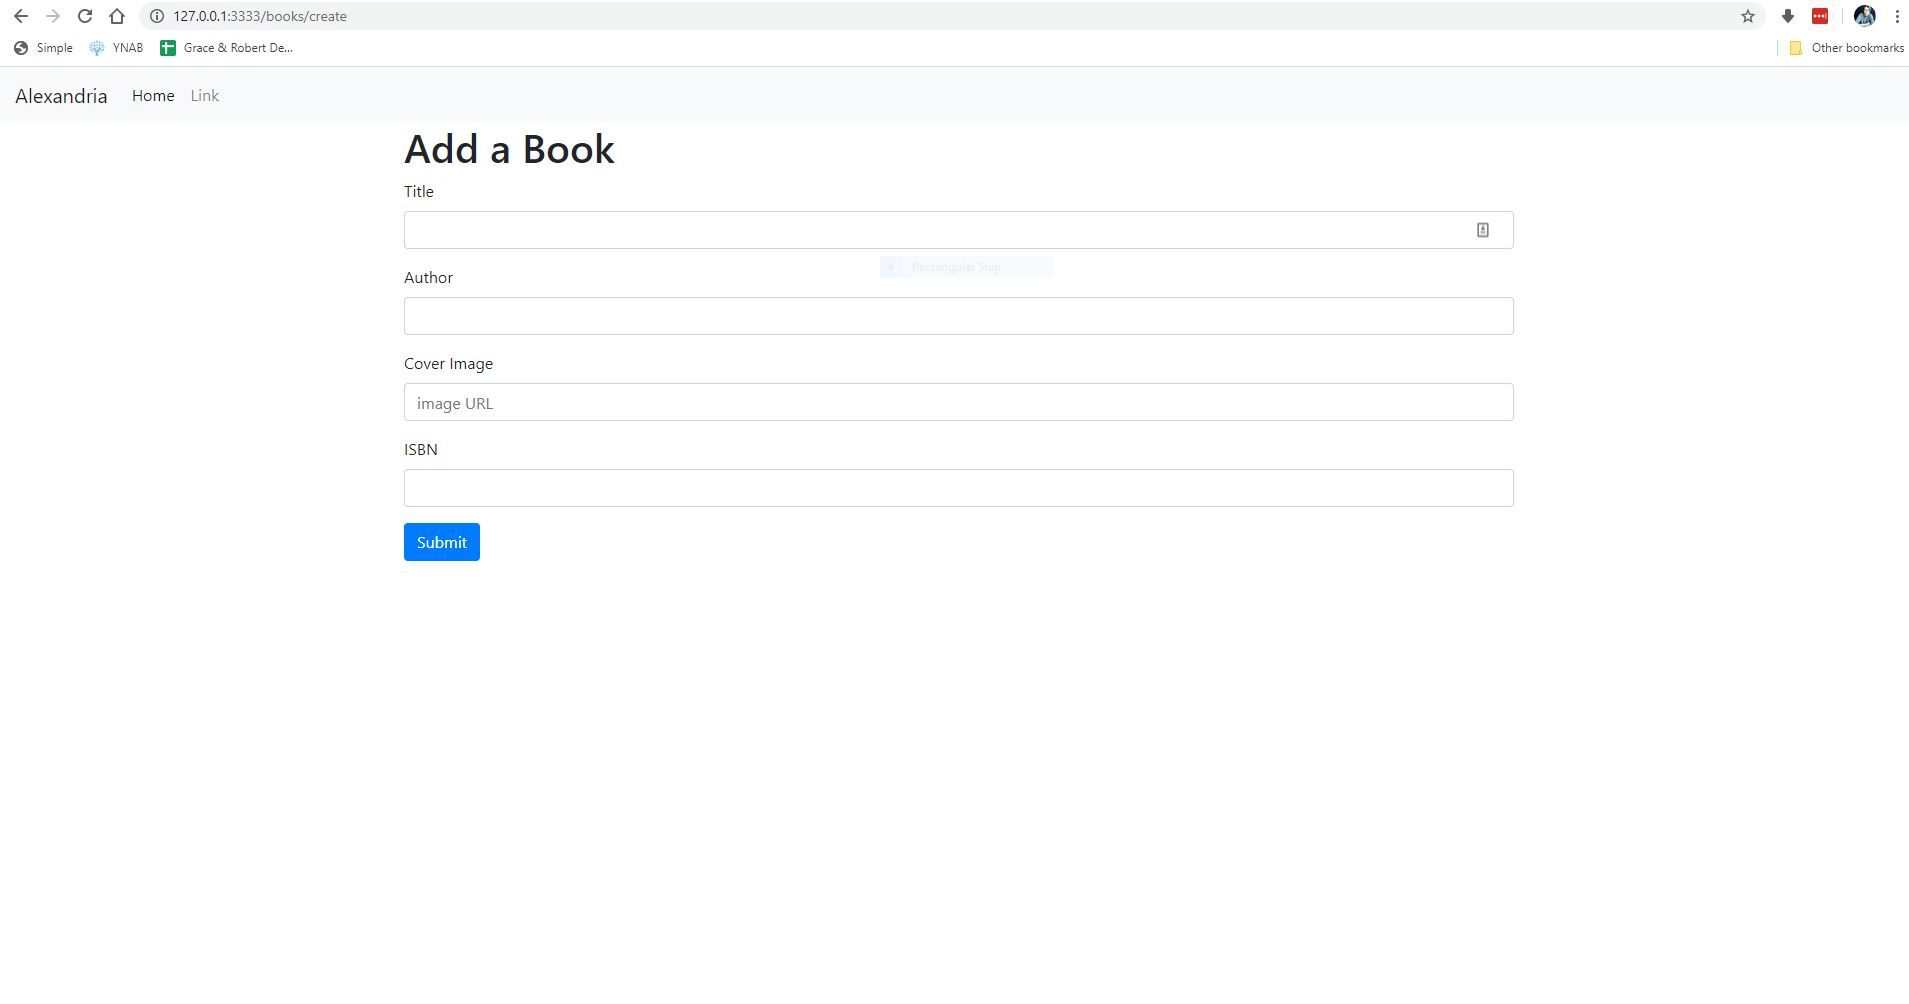
We now need to create our store method on our Book controller that will take the data we fill out in this form and write it to our database.
In our book controller, we are going to need to import our Book model which we made earlier. This will allow the store method to interact with our Book model and write data to our database.
"use strict";

const Book = use("App/Models/Book");

class BookController {
// ...
Now let's add our store method.
async store({ request, response }) {
  const book = new Book();

  book.title: request.input("title");
  book.author = request.input("author");
  book.cover_image = request.input("cover_image");
  book.isbn = request.input("isbn");

  await book.save();

  return response.redirect("/");
}
This method needs access to the request and response objects, so we are passing those in. Then we are instantiating a new instance of our Book model. We are then assigning our various book properties from our form to this new Book object.
request.input('title') grabs the input field on our form with the name="title" attribute, same is true for the other respective attributes
We then save our book to the database await book.save() and finally we redirect to the home route return response.redirect("/").
Now we need to create a new route to handle this new request. Since we are creating a book, this needs to be a POST request.
Updated routes.js with the following:
Route.post("books", "BookController.store");

("use strict");

/*
    |--------------------------------------------------------------------------
    | Routes
    |--------------------------------------------------------------------------
    |
    | Http routes are entry points to your web application. You can create
    | routes for different URL's and bind Controller actions to them.
    |
    | A complete guide on routing is available here.
    | http://adonisjs.com/docs/4.1/routing
    |
    */

/** @type {typeof import('@adonisjs/framework/src/Route/Manager')} */
const Route = use("Route");

Route.on("/").render("welcome");
Route.get("/books", "BookController.index");
Route.get("books/create", "BookController.create");
Route.post("books", "BookController.store");
Finally, we need to tell our create.edge form to use this new route.
<form action="/books" method="POST"></form>
@layout('layouts.default')

@section('content')
  <h1>Add a Book</h1>

  <form action="/books" method="POST">
    {{ csrfField() }}

    <div class="form-group">
      <label for="">Title</label>
      <input type="text" name="title" class="form-control">
    </div>

    <div class="form-group">
      <label for="">Author</label>
      <input type="text" name="author" class="form-control">
    </div>

    <div class="form-group">
      <label for="">Cover Image</label>
      <input type="text" name="cover_image" class="form-control" placeholder="image URL">
    </div>

    <div class="form-group">
      <label for="">ISBN</label>
      <input type="text" name="isbn" class="form-control">
    </div>

    <input type="submit" value="Submit" class="btn btn-primary">
  </form>
@endsection
I also added {{ csrfField() }} just below our <form> element as this is a special method in Adonis that will prevent Cross Site Request Forgery. Adonis will throw an error if we do not include this.
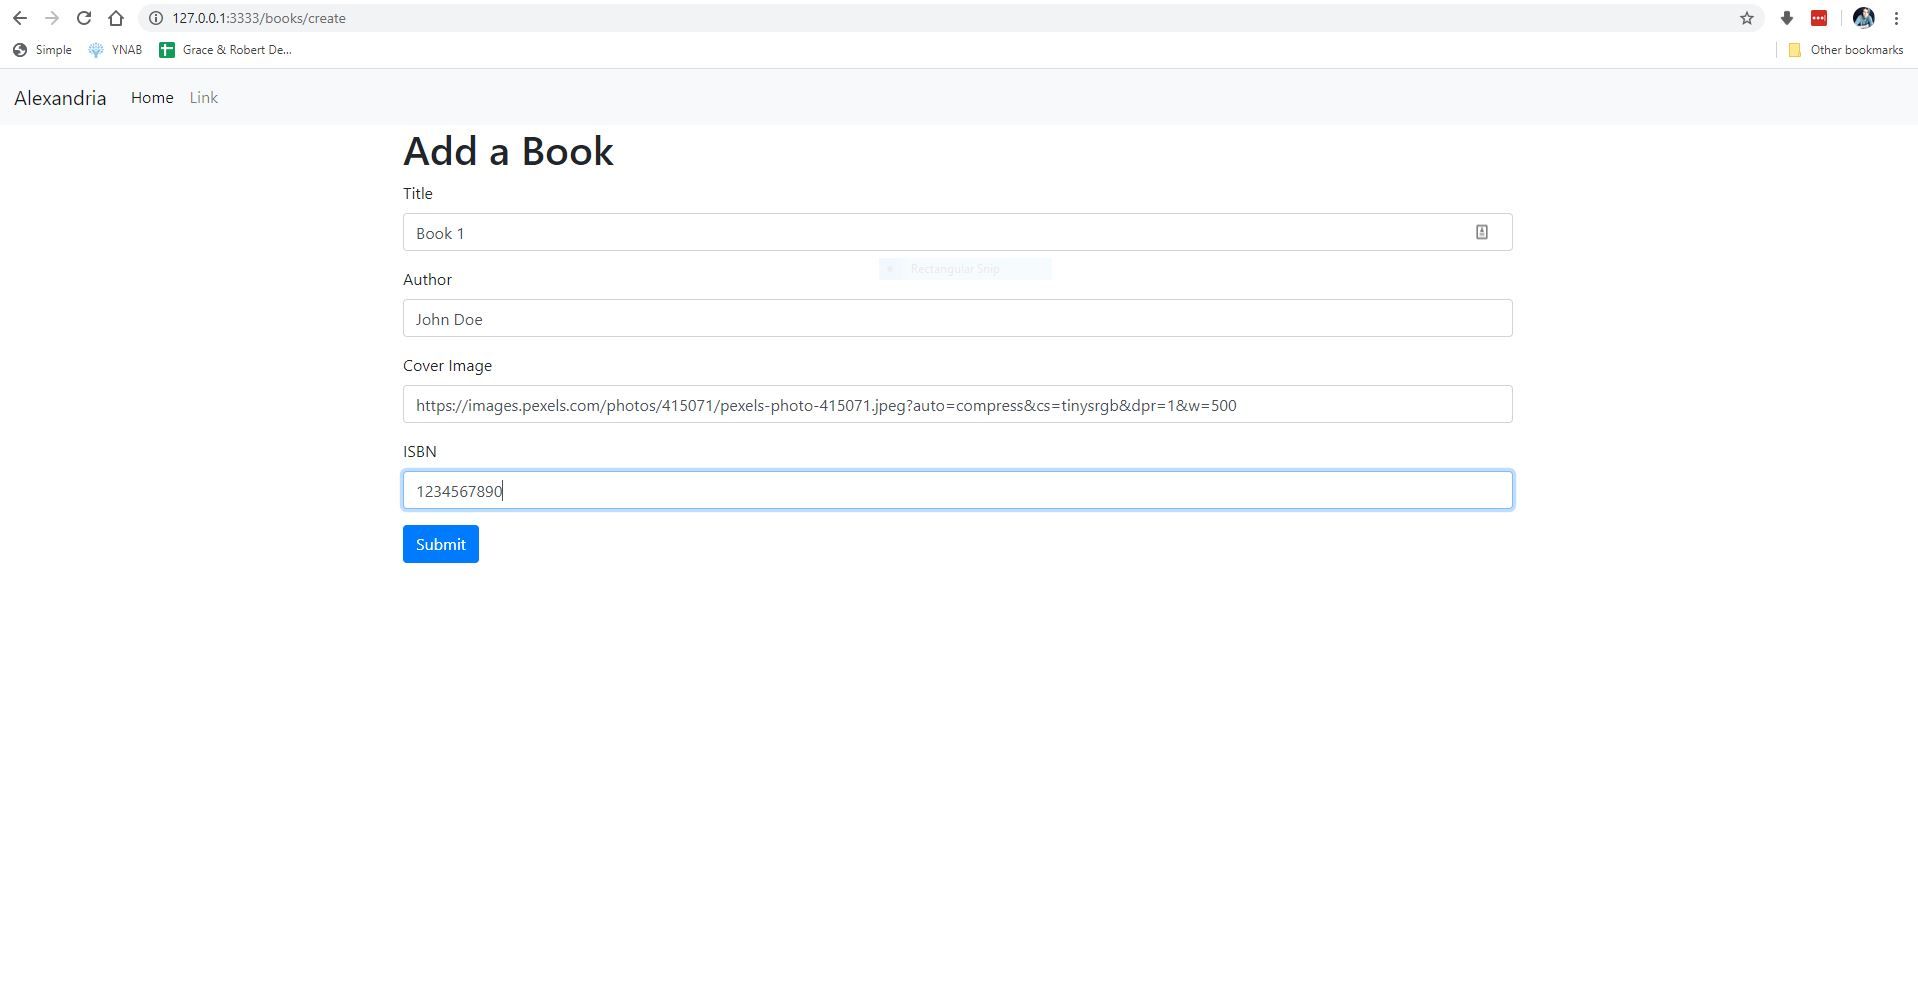
Let's fill out our form and see if our book is saved.
After clicking submit, you should be redirected to the home page.
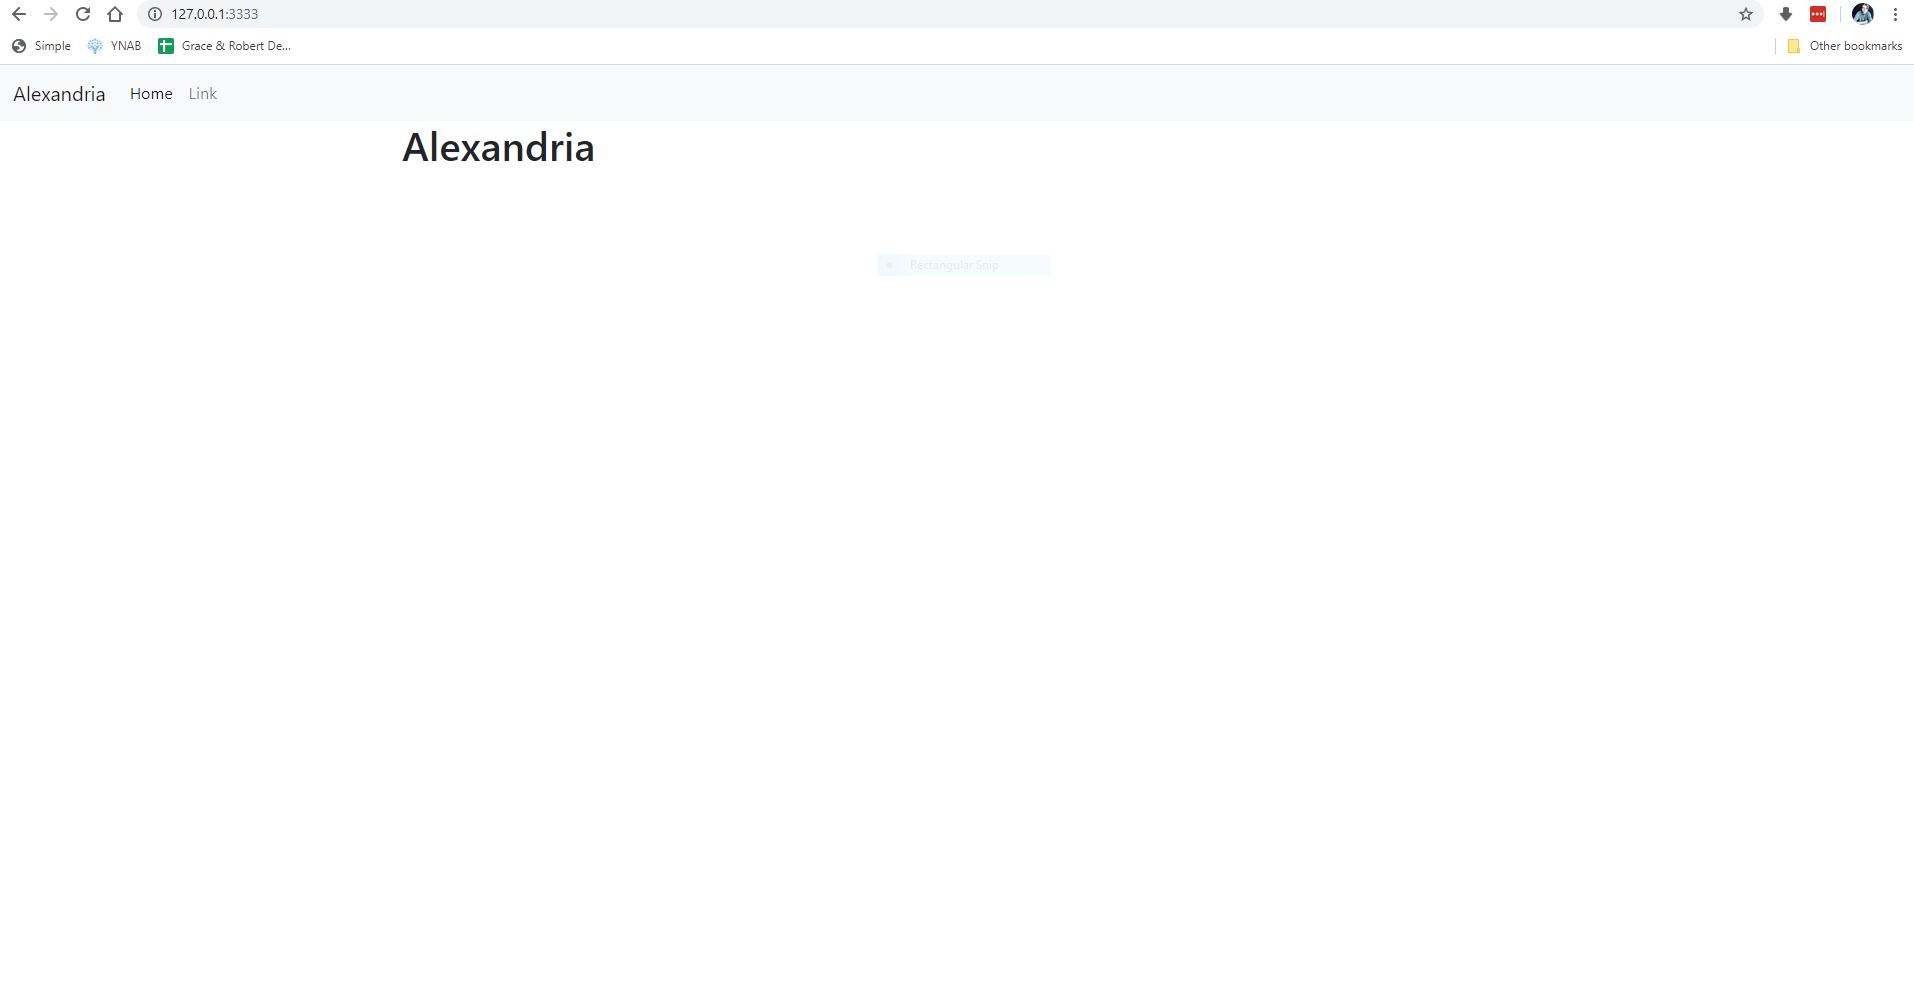
Let's check our database and see if our new book has been added.
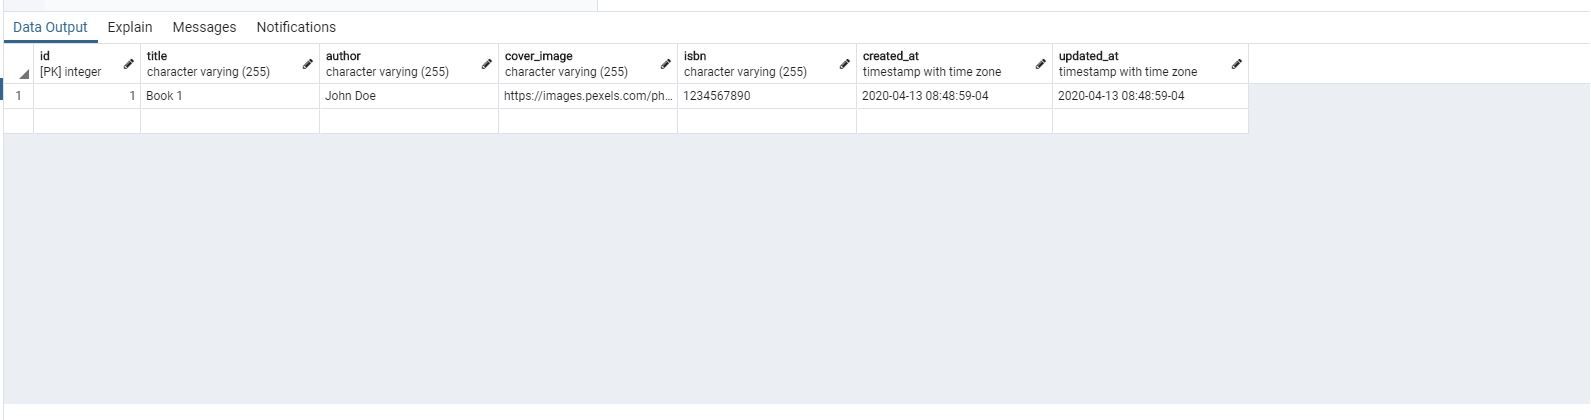
Great! We have now successfully added a new book to our database. However, there is a lot more we can do to improve the experience.
Validations
Currently, our form to create a new book can accept any kind of input, and even be empty. To prevent this, we will add some form validation, which we can do quite easily, as validation is built into Adonis.
First, we need to install the Validator package, as it does not come with Adonis by default.
adonis install @adonisjs/validator
Next, we need to register this package within our app/start.js file:
const providers = [
  "@adonisjs/framework/providers/AppProvider",
  "@adonisjs/framework/providers/ViewProvider",
  "@adonisjs/lucid/providers/LucidProvider",
  "@adonisjs/bodyparser/providers/BodyParserProvider",
  "@adonisjs/cors/providers/CorsProvider",
  "@adonisjs/shield/providers/ShieldProvider",
  "@adonisjs/session/providers/SessionProvider",
  "@adonisjs/auth/providers/AuthProvider",
  "@adonisjs/validator/providers/ValidatorProvider", // our new validator package
];
Then, we need to modify our create.edge view with the following:
@layout('layouts.default')

@section('content')
  <h1>Add a Book</h1>

  <form action="/books" method="POST">
    {{ csrfField() }}

    <div class="form-group">
      <label for="">Title</label>
      <input type="text" name="title" class="form-control" value="{{ old('title', '') }}">
      {{ elIf('<span class="text-danger">$self</span>', getErrorFor('title'), hasErrorFor('title')) }}
    </div>

    <div class="form-group">
      <label for="">Author</label>
      <input type="text" name="author" class="form-control" value="{{ old('author', '') }}">
      {{ elIf('<span class="text-danger">$self</span>', getErrorFor('author'), hasErrorFor('author')) }}
    </div>

    <div class="form-group">
      <label for="">Cover Image</label>
      <input type="text" name="cover_image" class="form-control" placeholder="image URL" value="{{ old('cover_image','') }}">
      {{ elIf('<span class="text-danger">$self</span>', getErrorFor('cover_image'), hasErrorFor('cover_image')) }}
    </div>

    <div class="form-group">
      <label for="">ISBN</label>
      <input type="text" name="isbn" class="form-control" value="{{ old('isbn', '') }}">
      {{ elIf('<span class="text-danger">$self</span>', getErrorFor('isbn'), hasErrorFor('isbn')) }}
    </div>

    <input type="submit" value="Submit" class="btn btn-primary">
  </form>
@endsection
The syntax for validation within Adonis, is arguably a bit strange and funky in my opinion. The most important pieces are:
value="{{ old('title', '') }}
This is how the validator library validates the value of the input with the requirements within our controller's store method.
and
{{ elIf('<span class="text-danger">$self</span>', getErrorFor('title'),
hasErrorFor('title')) }}
This is what will output the validation error message just below the input with the error.
Finally, we need to update the Book controller's store method with our validation rules.
We need to include the validation library in our controller, like so:
"use strict";

const Book = use("App/Models/Book");
const { validate } = use("Validator");

// ...
Then we need to update our store method:
async store({ request, response, session }) {
  const validation = await validate(request.all(), {
    title: "required",
    author: "required",
    cover_image: "required",
    isbn: "required|min:10|max:10",
  });

  if (validation.fails()) {
    session.withErrors(validation.messages()).flashAll();
    return response.redirect("back");
  }

  const book = new Book();

  book.title: request.input("title");
  book.author = request.input("author");
  book.cover_image = request.input("cover_image");
  book.isbn = request.input("isbn");

  await book.save();

  return response.redirect("/");
}
We are making sure that all fields are required and that the ISBN number is exactly 10 numbers. If the validation fails, we are going to redirect the user "back," which refreshes the page to the current view they are on, which in this case is the create.edge view.
We are also passing in the session object which we need access to in order to grab any error messages that occur.
Let's test out our validation, and see if it is working properly.
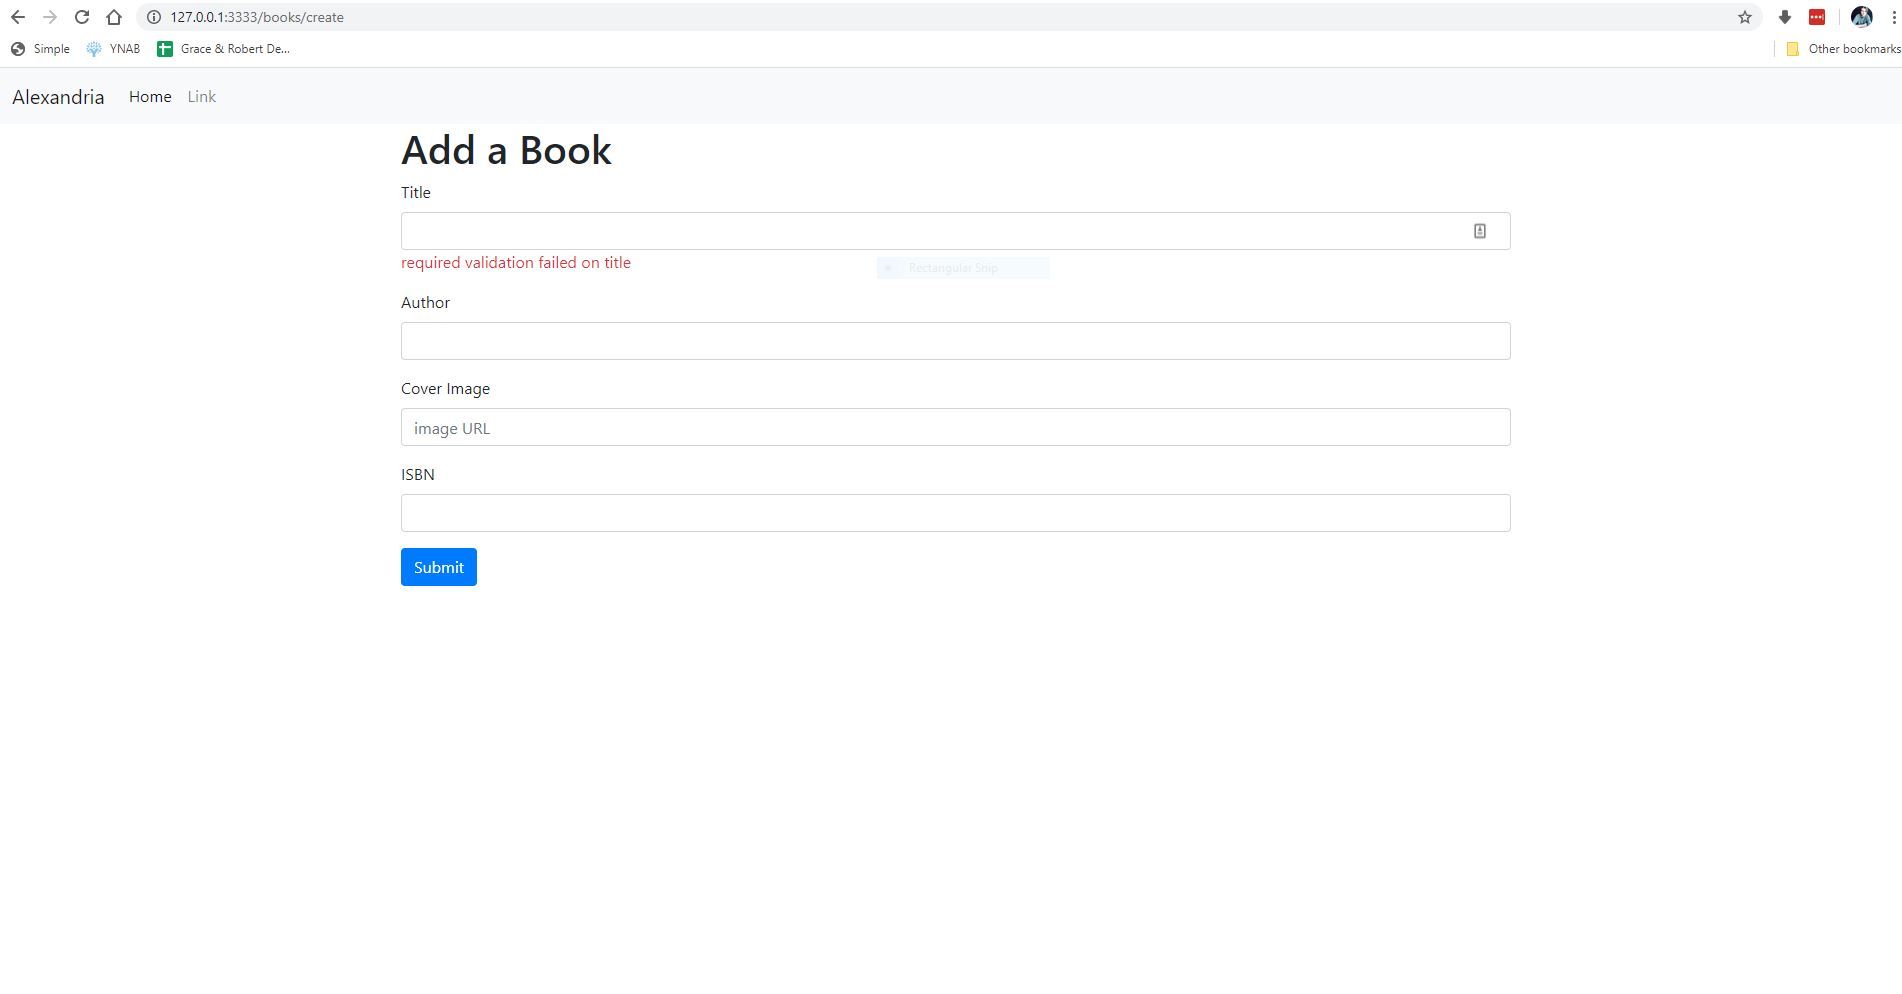
Looks like everything is working as expected! If there are multiple errors, it will display the first error, one at a time.
Flash Messages
There is still one problem which we need to address before we wrap up this section. The user has no idea whether or not a book has been added successfully. The only way one can tell, is if they check the database manually. Instead, we are going to flash a message to the user if the book was added successfully.
If a book has been added successfully, we are currently redirecting the user to the home page. Which is done via *return* response.redirect("/"); at the bottom of our store method. We therefore need to display a success message once they land on this page to let them know the books has been added successfully.
Let's first update our root route, to the book index. Update routes.js with the following:
"use strict";

/*
    |--------------------------------------------------------------------------
    | Routes
    |--------------------------------------------------------------------------
    |
    | Http routes are entry points to your web application. You can create
    | routes for different URL's and bind Controller actions to them.
    |
    | A complete guide on routing is available here.
    | http://adonisjs.com/docs/4.1/routing
    |
    */

/** @type {typeof import('@adonisjs/framework/src/Route/Manager')} */
const Route = use("Route");

// Route.on("/").render("welcome");
Route.get("/", "BookController.index");
Route.get("books/create", "BookController.create");
Route.post("books", "BookController.store");
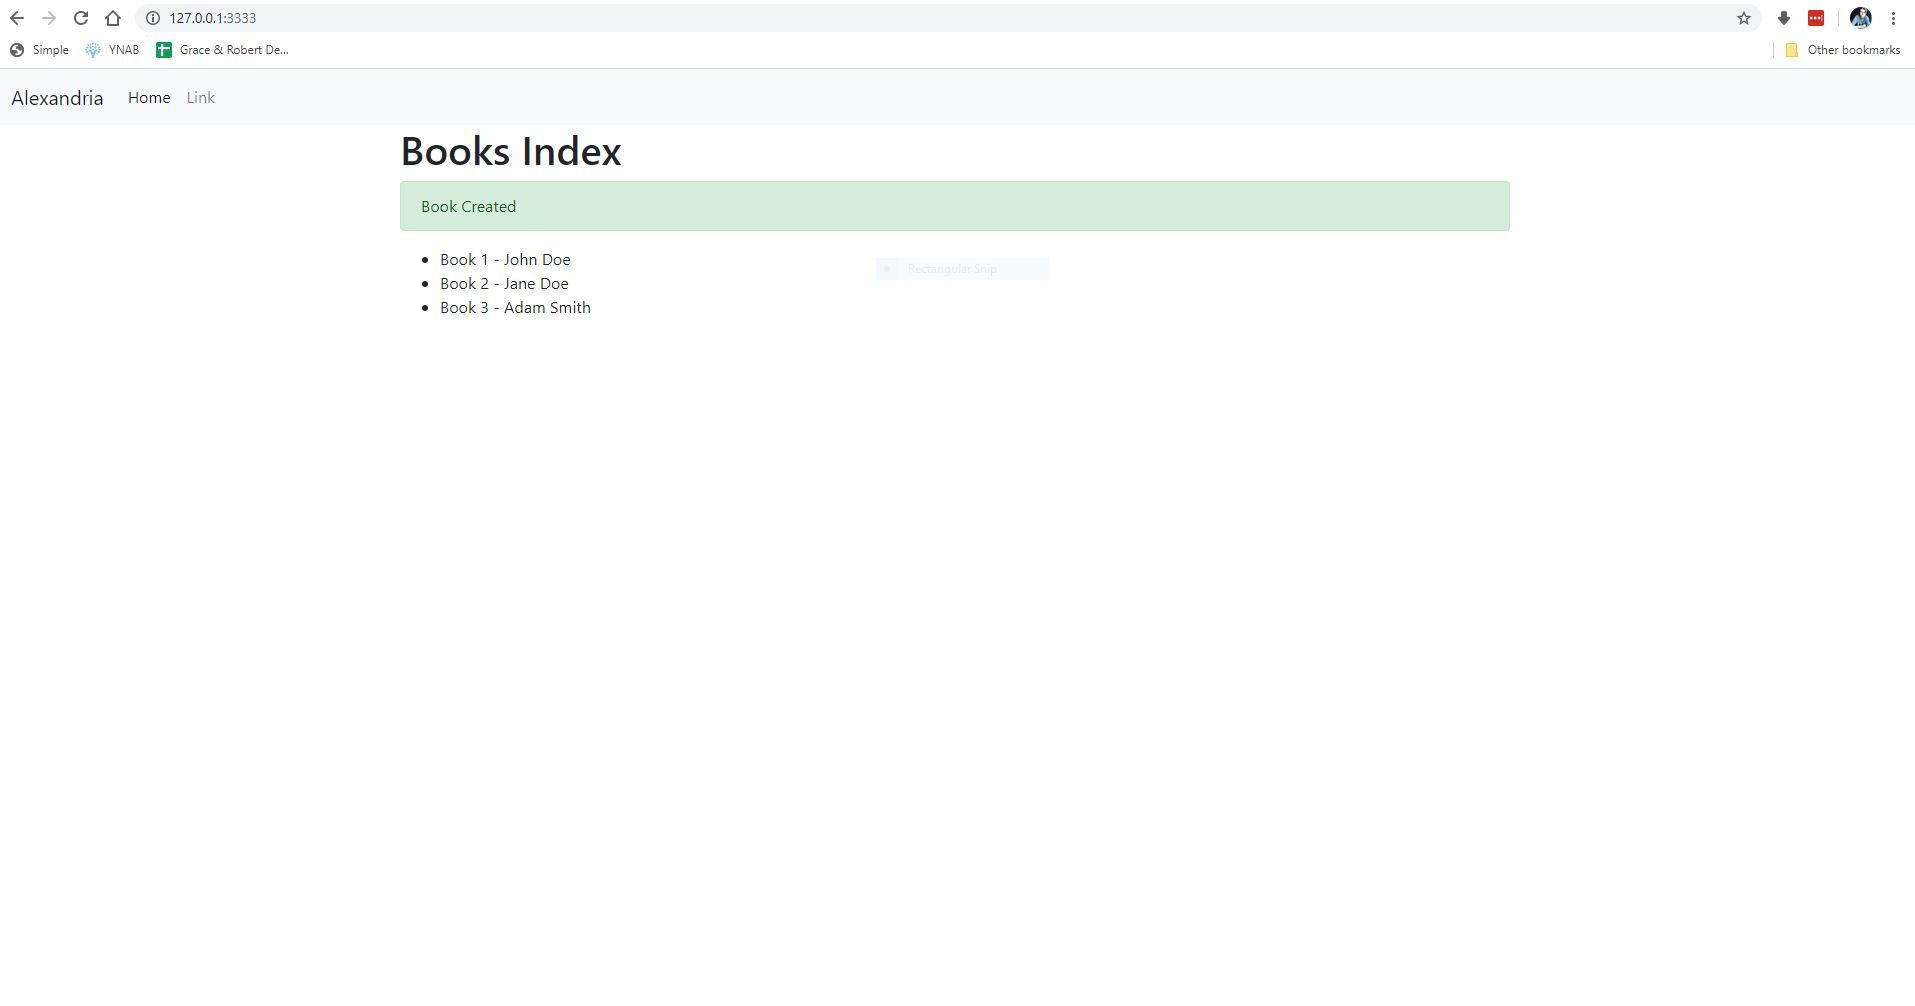
Now, if we go to http://localhost:3333/ we will land our Book index view.
Add the following to book/index.edge:
@layout('layouts.default')
@section('content')

<h1>Books Index</h1>

@if(old('notification'))
<div class="alert alert-success">{{ old('notification') }}</div>
@endif

<ul>
  @each(book in books)
  <li>{{ book.title }} - {{ book.author }}</li>
  @endeach
</ul>
@endsection
The @if(old('notification')) conditional is what will display our flash notice if there is any.
Next, we need to update our store method. Add the following just before our return statement that redirects the user back to the home page.
session.flash({ notification: "Book Created" });
Our entire store method now looks like:
async store({ request, response, session }) {
  const validation = await validate(request.all(), {
    title: "required",
    author: "required",
    cover_image: "required",
    isbn: "required|min:10|max:10",
  });

  if (validation.fails()) {
    session.withErrors(validation.messages()).flashAll();
    return response.redirect("back");
  }

  const book = new Book();

  book.title: request.input("title");
  book.author = request.input("author");
  book.cover_image = request.input("cover_image");
  book.isbn = request.input("isbn");

  await book.save();

  session.flash({ notification: "Book Created" });
  return response.redirect("/");
}
Fill out the form, with all the required fields and an ISBN number that is 10 digits and submit. We should see a flash message now on the home page.
Repo
The code for this section can be found in the repo under the branch 3-forms-validation-models.
Wrap Up
In this section, we learned about migrations, models, forms, validation and flash messages. In the next section, we will learn about seeds, factories and how to edit and delete books.