Jamstack
Jamstack ecommerce site with Gatsby & Stripe Checkout
Updated:
This project builds on top of the Gatsby E-commerce Tutorial provided in the official Gatsby docs, and the Use Shopping Cart Example repo.
In this project, we will be creating a simple e-commerce web site with Gatbsy and Stripe checkout. Stripe checkout is client-side checkout that allows us to integrate a complete checkout experience without a backend.
Installing Gatsby
First, you will need to download and install Gatsby
npm i -g gatsby-cli
With the CLI installed, create a new project.
gatsby new stripe-checkout
# name the project whatever you would like
Open up the project and run the development server.
gatsby develop
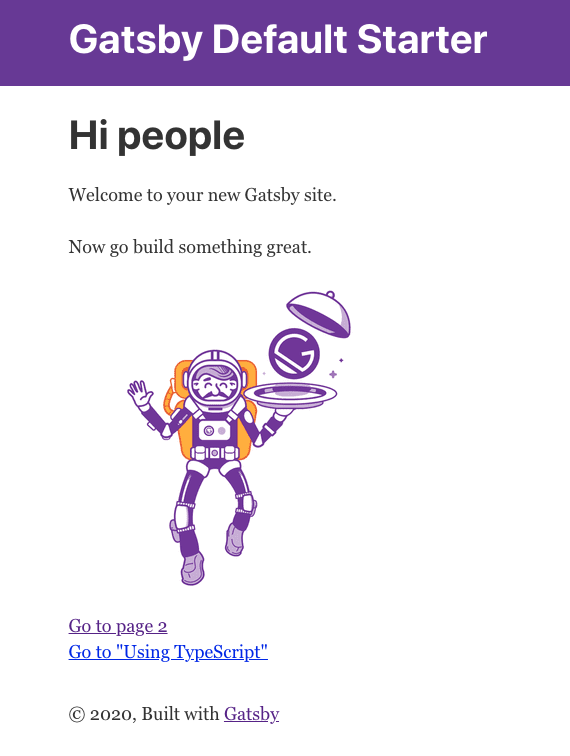
Once the server is up and running, you should be able to preview the site at http://localhost:8000/.
Installing & Configuring Stripe
You will need to create a Stripe account if you don't already have one. You can sign up for a free account to provide all that we need for our project.
Once you have your Stripe account set up, head back over to your terminal to install the Stripe NPM packages.
npm install @stripe/stripe-js gatsby-source-stripe
With both of these packages installed, we now need to add the gatsby-source-stripe plugin to our gatsby-config.js file. Add the following to the config.
{
  resolve: `gatsby-source-stripe`,
  options: {
    objects: ["Price"],
    secretKey: 'secret key goes here',
    downloadFiles: false,
  }
},
You will notice a key called secretKey that we need to populate with Stripe's secret key. We will configure this next.
The entire file should look like this.
module.exports = {
  siteMetadata: {
    title: `Gatsby Default Starter`,
    description: `Gatsby Default Starter`,
    author: `@gatsbyjs`,
  },
  plugins: [
    `gatsby-plugin-react-helmet`,
    {
      resolve: `gatsby-source-filesystem`,
      options: {
        name: `images`,
        path: `${__dirname}/src/images`,
      },
    },
    `gatsby-transformer-sharp`,
    `gatsby-plugin-sharp`,
    {
      resolve: `gatsby-plugin-manifest`,
      options: {
        name: `gatsby-starter-default`,
        short_name: `starter`,
        start_url: `/`,
        background_color: `#663399`,
        theme_color: `#663399`,
        display: `minimal-ui`,
        icon: `src/images/gatsby-icon.png`,
      },
    },
    {
      resolve: `gatsby-source-stripe`,
      options: {
        objects: ['Price'],
        secretKey: 'secret key goes here',
        downloadFiles: false,
      },
    },
  ],
}
Head back over to the Stripe dashboard and click on "Developers" and then "API keys" on the left-hand side.
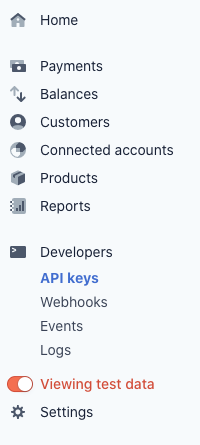
make sure to toggle on the "Viewing test data" as well.
In the "Standard keys" section, you should see the following.
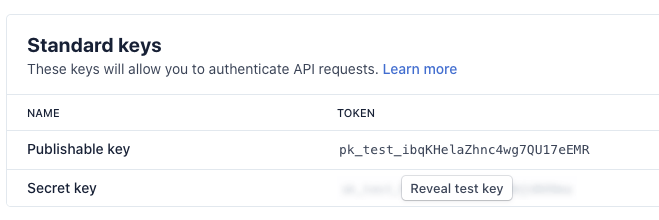
Click the "Reveal live key" to show your secret key and then copy it.
Creating .env variables
We do not want to paste our secret key into our gatsby config because it would expose it to the outside world. This is a huge security risk! To protect our keys, we will create a .env file, which allows us to use our keys without exposing them to the public.
In the root of our gatsby project, create two files called .env.development & .env.production
touch .env.development
touch .env.production
Within both files, add both your Publishable and Secret keys like so:
GATSBY_STRIPE_SECRET_KEY=sk_test_FOlN...
GATSBY_STRIPE_PUBLISHABLE_KEY=pk_test_ibqK...
The GATSBY prefix is important because we need these variables exposed to the client. You can read more about this here
.env.production will contain the keys we need for production; for the sake of this example, our keys will be the same, but in a real-world project, they would be different.
Now let's add this file to .gitignore.
# dotenv environment variable files
.env*
This may already exist from when we first created our project, but double-check just in case.
Now we need to use these env variables in our Gatsby config.
{
  resolve: `gatsby-source-stripe`,
  options: {
    objects: ['Price'],
    secretKey: process.env.GATSBY_STRIPE_SECRET_KEY,
    downloadFiles: false,
  },
},
We also need to include our .env.development file in our config to have access to the variables. Add the following snippet to the top of the gatsby-config.js file just above the module.exports = {
require("dotenv").config({
  path: `.env.${process.env.NODE_ENV}`,
})

module.exports = {
Stripe Checkout
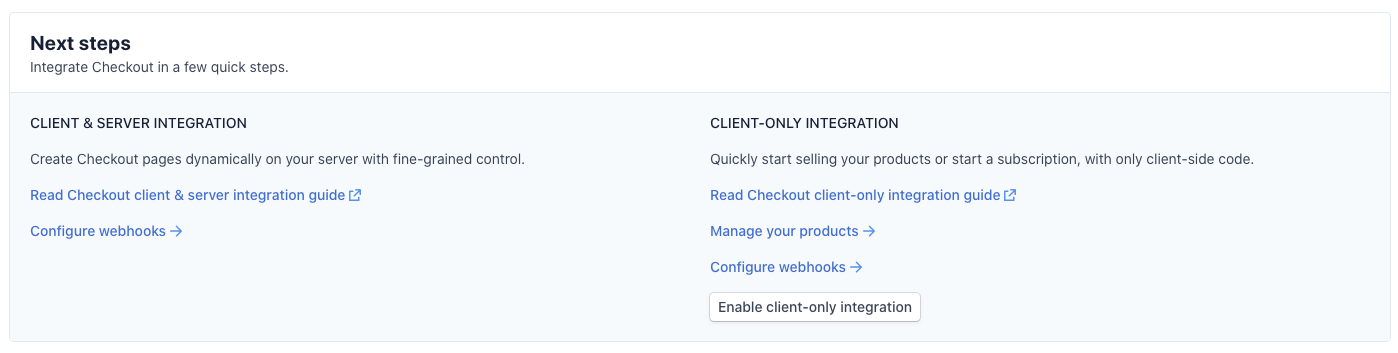
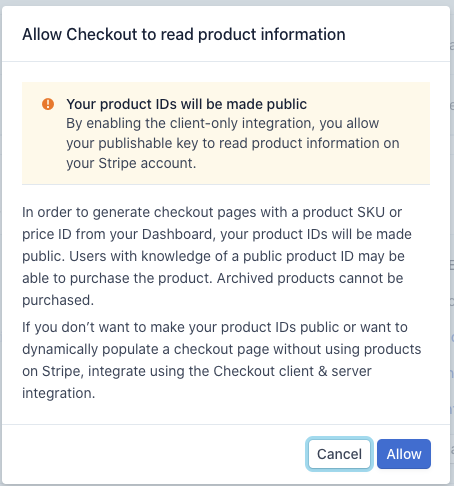
Now let's set up and configure Stripe checkout. Head over to https://dashboard.stripe.com/settings/checkout. Under the "Next steps" section, click the "Enable client-only integration" button.
Click "Allow" on the modal that pops up.
You should now see some additional fields in the "Next steps" section.
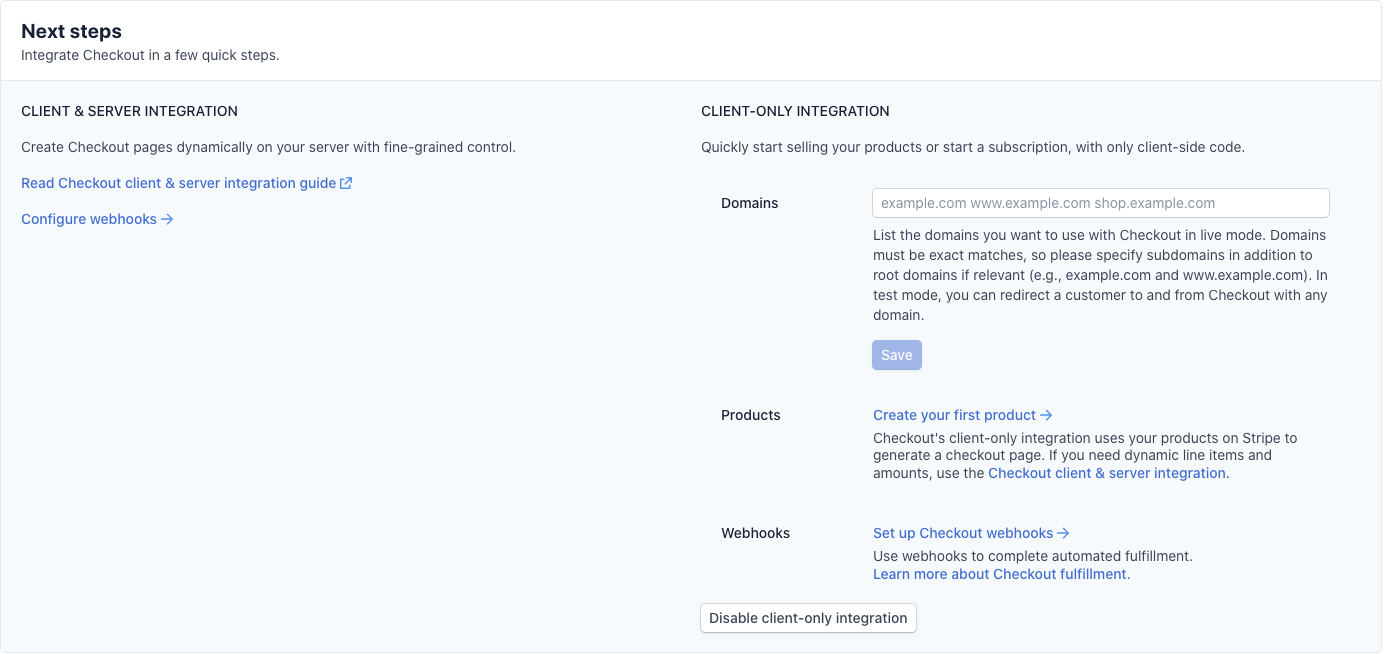
Next, we need to create some products in Stripe to sell on our site. Click on the "Create your first product" link.
On the next screen, click on the "Add Product" button to add our first product.
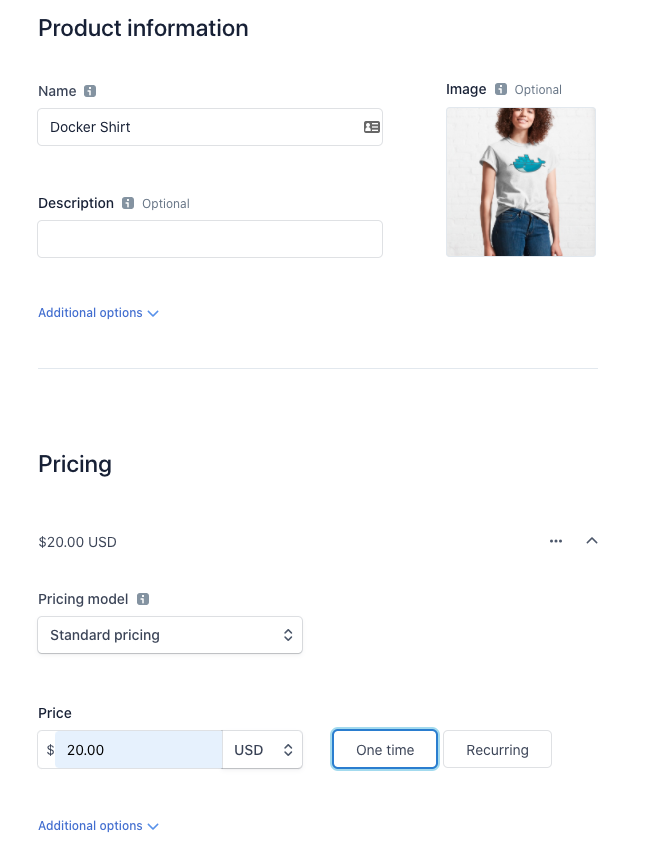
For this example store, we are going to be selling t-shirts for developers. So let's find some images of dev t-shirt's that we can sell. You are free to use whatever images or products you would like. I am going to use some photos I found from Redbubble
Enter a name for the product, upload the image, set the price, and check the "one-time" button.
Make sure to add a few products so that we have some actual products to populate our store page with.
Adding Stripe as a utility function
Per Gatsby's docs, they recommend that we wrap Stripe.js into a utility function so that we can use it across multiple pages.
Create a new file in src/utils/stripejs.js and add the following.
you will need to create the utils folder as well
import { loadStripe } from '@stripe/stripe-js'

let stripePromise
const getStripe = () => {
  if (!stripePromise) {
    stripePromise = loadStripe(process.env.GATSBY_STRIPE_PUBLISHABLE_KEY)
  }
  return stripePromise
}

export default getStripe
Adding a shopping cart
We will be installing a shopping cart package that will allow our customers to add t-shirts to their cart, as this does not come out of the box with Stripe checkout. Otherwise, customers will only be able to buy a single product at a time.
We will be installing Use-Shopping-Cart
Install the shopping cart with the following command.
npm install --S use-shopping-cart
Displaying our products
Now that we have some products uploaded to Stripe, and your shopping cart installed, we need to display them on our Gatsby site.
The following code comes from the Use Shopping Cart Example Gatsby Repo with only slight modifications made by me
Index Page
Withing /pages/index.js, add the following.
import React from 'react'

import Layout from '../components/layout'
import SEO from '../components/seo'

import Skus from '../components/Products/Skus'
import CartOverview from '../components/CartOverview'

import { loadStripe } from '@stripe/stripe-js'
import { CartProvider } from 'use-shopping-cart'

const stripePromise = loadStripe(process.env.GATSBY_STRIPE_PUBLISHABLE_KEY)

const CartExample = () => (
  <Layout>
    <SEO title="Cart Example" />
    <h1>Checkout with cart example</h1>
    <h2>
      With{' '}
      <a href="https://use-shopping-cart.netlify.app/">use-shopping-cart</a>
    </h2>
    <CartProvider
      mode="client-only"
      stripe={stripePromise}
      successUrl={`${window.location.origin}/page-2/`}
      cancelUrl={`${window.location.origin}/`}
      currency="USD"
      allowedCountries={['US', 'GB', 'CA']}
      billingAddressCollection={true}
    >
      <CartOverview />
      <Skus />
    </CartProvider>
  </Layout>
)

export default CartExample
Index Page Breakdown
<CartProvider // This component comes from the use-shopping-cart package
  mode="client-only" // allows client-side checkout
  stripe={stripePromise} // Our Stripe instance so we can communicate with the Stripe API
  successUrl={`${window.location.origin}/page-2/`} // the url to redirect to after a successful purchase
  cancelUrl={`${window.location.origin}/`} // the url to redirect to when they cancel a purchase
  currency="USD" // US Dollars is the type of currency we are accepting
  allowedCountries={['US', 'GB', 'CA']}
  billingAddressCollection={true} // allows the collection of the users billing address for Stripe
>
  <CartOverview /> // We will create and go over this component later
  <Skus /> // We will create and go over this component next
</CartProvider>
Skus Component
Create a new folder called Products inside the src/components folder and create a file called Skus.js.
// src/components/Products/Skus.js
import React from 'react'
import { graphql, StaticQuery } from 'gatsby'
import SkuCard from './SkuCard'

const conatinerStyles = {
  display: 'flex',
  flexDirection: 'row',
  flexWrap: 'wrap',
  justifyContent: 'space-between',
  padding: '1rem 0 1rem 0',
}

export default (props) => (
  <StaticQuery
    query={graphql`
      query ProductPrices {
        prices: allStripePrice(
          filter: { active: { eq: true }, currency: { eq: "usd" } }
          sort: { fields: [unit_amount] }
        ) {
          edges {
            node {
              id
              active
              currency
              unit_amount
              product {
                id
                name
                images
              }
            }
          }
        }
      }
    `}
    render={({ prices }) => (
      <div style={conatinerStyles}>
        {prices.edges.map(({ node: price }) => {
          const newSku = {
            sku: price.id,
            name: price.product.name,
            price: price.unit_amount,
            currency: price.currency,
            image: price.product.images,
          }
          return <SkuCard key={price.id} sku={newSku} />
        })}
      </div>
    )}
  />
)
Skus Component Brekdown
query ProductPrices {
  prices: allStripePrice(
    filter: { active: { eq: true }, currency: { eq: "usd" } }
    sort: { fields: [unit_amount] }
  ) {
    edges {
      node {
        id
        active
        currency
        unit_amount
        product {
          id
          name
          images
        }
      }
    }
  }
}
This is our GraphQL query which fetches the product data from Stripe. We are filtering for only active products where the currency is == US Dollars. We then retrieve the id, whether or not the product is active, the currency, unit_amount, product id, product name, and product images.
render={({ prices }) => (
  <div style={conatinerStyles}>
    {prices.edges.map(({ node: price }) => {
      const newSku = {
        sku: price.id,
        name: price.product.name,
        price: price.unit_amount,
        currency: price.currency,
        image: price.product.images,
      }
      return <SkuCard key={price.id} sku={newSku} />
    })}
  </div>
)}
We then take the results of our GraphQL query and map over the products returned and create a newSku object for each product. We then take the newSku object and pass it into the <SkuCard /> component via the sku prop.
Sku Card Component
Create a new file called SkuCard.js in the src/components/Products folder.
// src/components/Products/SkuCard.js
import React from 'react'

import { useShoppingCart, formatCurrencyString } from 'use-shopping-cart'

const cardStyles = {
  display: 'flex',
  flexDirection: 'column',
  justifyContent: 'space-around',
  alignItems: 'flex-start',
  padding: '1rem',
  marginBottom: '1rem',
  boxShadow: '5px 5px 25px 0 rgba(46,61,73,.2)',
  backgroundColor: '#fff',
  borderRadius: '6px',
  maxWidth: '300px',
}
const buttonStyles = {
  fontSize: '13px',
  textAlign: 'center',
  color: '#fff',
  outline: 'none',
  padding: '12px',
  boxShadow: '2px 5px 10px rgba(0,0,0,.1)',
  backgroundColor: 'rgb(255, 178, 56)',
  borderRadius: '6px',
  letterSpacing: '1.5px',
}

const SkuCard = ({ sku }) => {
  const { addItem } = useShoppingCart()

  return (
    <div style={cardStyles}>
      <img src={sku.image} alt="" />
      <h4>{sku.name}</h4>
      <p>
        Price:{' '}
        {formatCurrencyString({
          value: parseInt(sku.price),
          currency: sku.currency,
        })}
      </p>
      <button style={buttonStyles} onClick={() => addItem(sku)}>
        ADD TO CART
      </button>
    </div>
  )
}

export default SkuCard
Sku Card Component Breakdown
This component is fairly straight forward. We take the data passed into it via the sku prop and then render the appropriate markup and styling accordingly. This card component will wrap each of our products and display the product image, name, price and the Add to Cart button.
Shopping Cart Component
Lastly, we will create a component for our shopping cart.
// src/components/CartOverview.js

import React, { useState } from 'react'

import { useShoppingCart } from 'use-shopping-cart'

const buttonStyles = {
  fontSize: '13px',
  textAlign: 'center',
  color: '#fff',
  outline: 'none',
  padding: '12px',
  boxShadow: '2px 5px 10px rgba(0,0,0,.1)',
  backgroundColor: 'rgb(255, 178, 56)',
  borderRadius: '6px',
  letterSpacing: '1.5px',
}

const Cart = () => {
  const [loading, setLoading] = useState(false)
  /* Gets the totalPrice and a method for redirecting to stripe */
  const { formattedTotalPrice, redirectToCheckout, cartCount, clearCart } =
    useShoppingCart()

  return (
    <div>
      {/* This is where we'll render our cart */}
      <p>Number of Items: {cartCount}</p>
      <p>Total: {formattedTotalPrice}</p>

      {/* Redirects the user to Stripe */}
      <button
        style={buttonStyles}
        disabled={loading}
        onClick={() => {
          setLoading(true)
          redirectToCheckout()
        }}
      >
        {loading ? 'Loading...' : 'Checkout'}
      </button>
      <button style={buttonStyles} onClick={clearCart}>
        Clear cart
      </button>
    </div>
  )
}

export default Cart
Shopping Cart Component Breakdown
Our shopping cart displays the total number of products in our cart and the total price of all of those items and two buttons. One button redirects to the checkout, which is Stripe checkout in our case, and the other empties the cart.
Our site should now look like this.
Finished Store
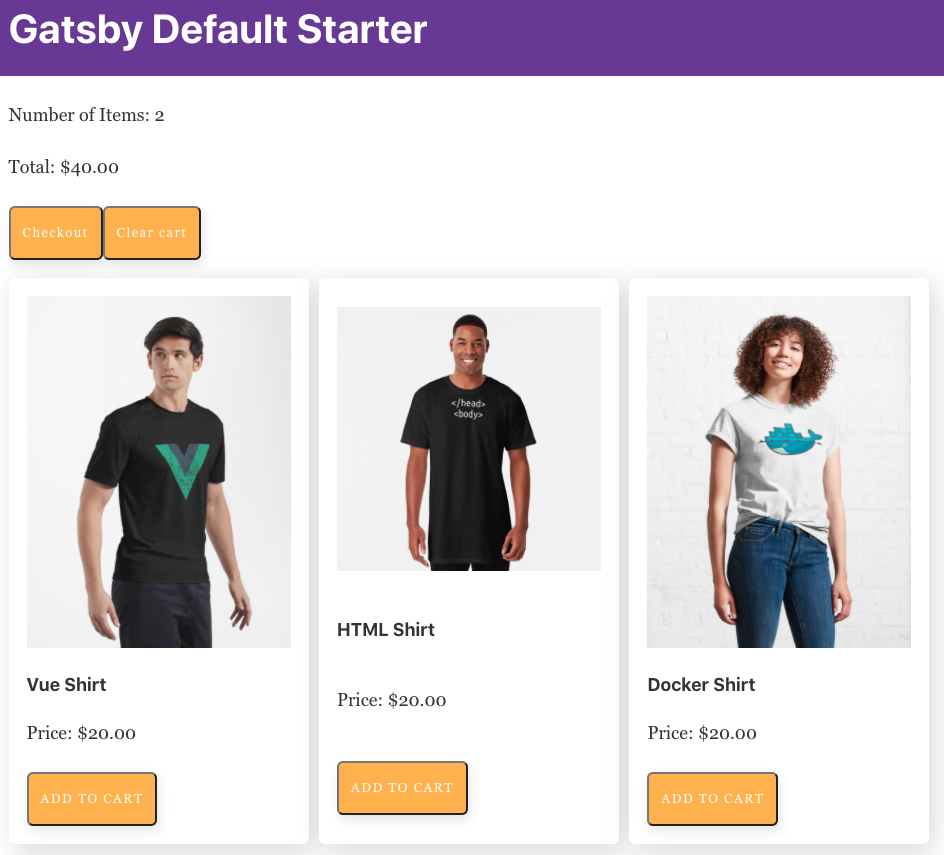
Add a couple of products to the cart and then click "Checkout."
If everything goes well, you will see Stripe checkout.
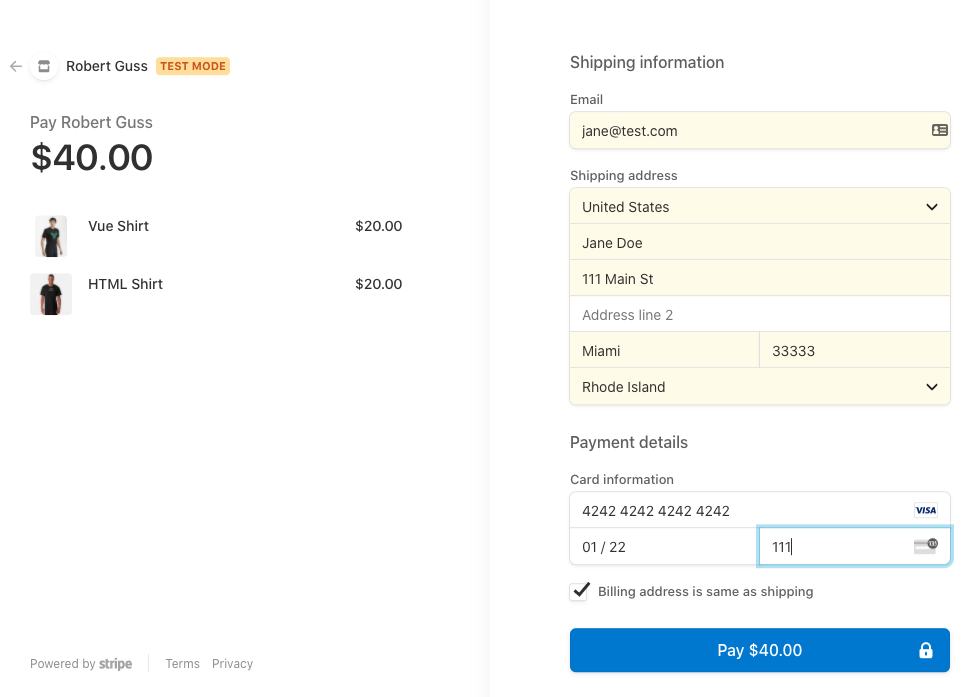
Fill out the details and use the special Stripe credit card 4242 4242 4242 4242. For the expiration date, choose any date in the future and use any three-digit number for the security code.
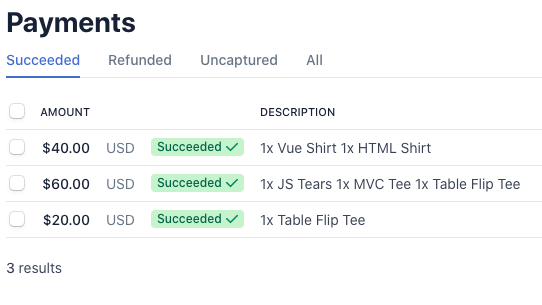
Now, if you open up your Stripe dashboard and click on "Payments" in the left sidebar, you should see the purchase you just made.
remember to make sure the "Viewing test data" is toggled on in the left sidebar
Deploying to Vercel
We will deploy our site to Vercel, another popular hosting provider for Jamstack sites. Head over there and sign up for a free account.
Before we can use Vercel, we first need to push our Gatsby site up to GitHub.
If you forget how to do this, please take a look back at the Hugo Blog project where I show you how to set this up.
After logging in, you should see Vercel's dashboard.
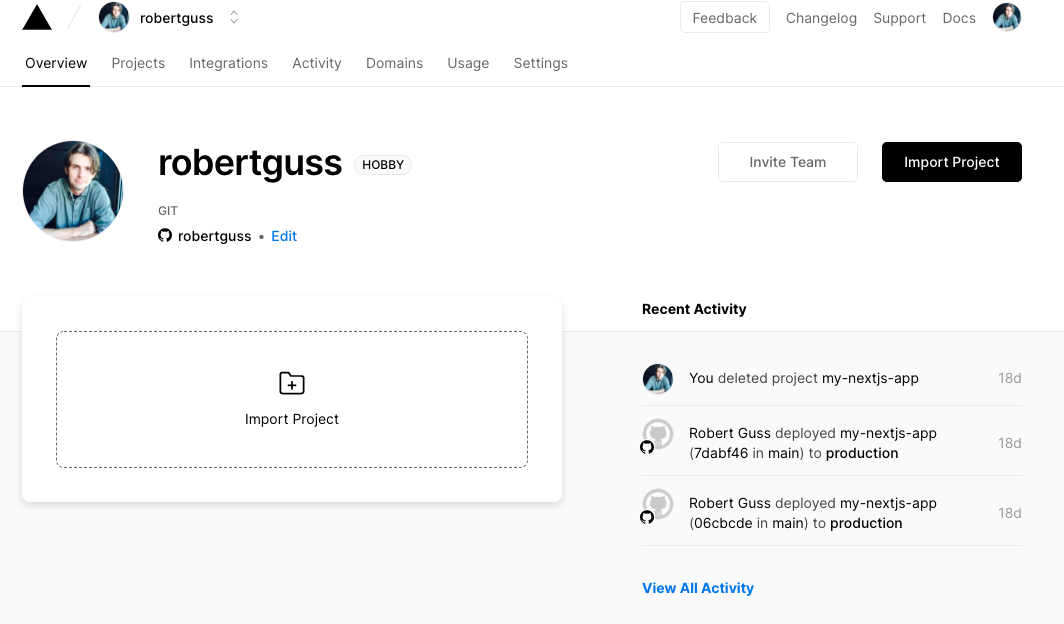
Click on "Import project" and then "Import Git Repository."
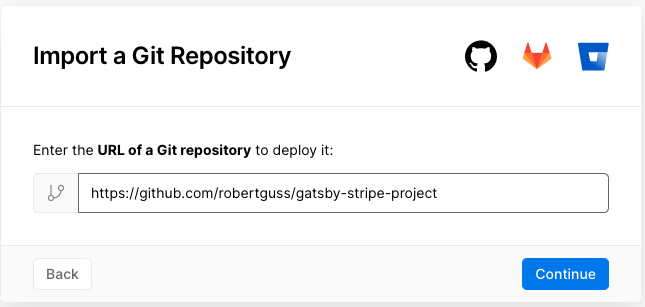
You then need to paste in the URL of your repo from GitHub and press "Continue."
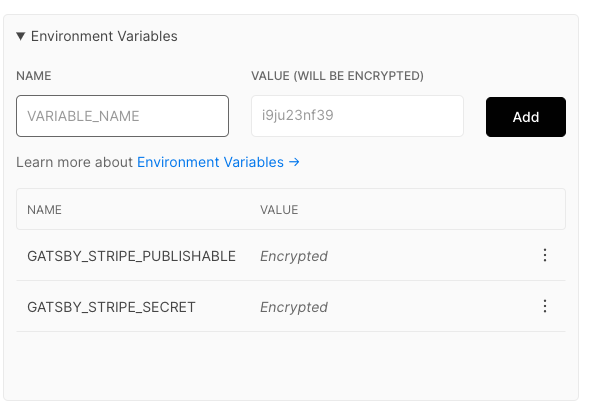
Vercel is smart enough to detect that this is a Gatsby project, and so the "Build and Output Settings" are already configured for us. However, we need to paste in our .env variables in the "Environment Variables" section.
Then press the "Deploy" button.
After a couple of mins or so, you should see the following.
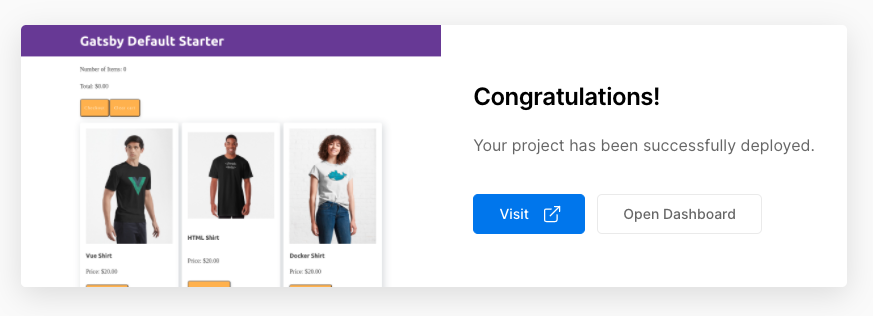
Click the "Visit" button to see the live site.
Make a test purchase to ensure that Stripe checkout is working correctly.
GitHub Repo
The completed project can be found here inside of Gatsby-eCommerce/final GitHub Repo
Wrap Up
In this tutorial, we learned how to create an ecommerce site using Gatsby and Stripe Checkout. We also installed a shopping cart plugin and deployed our site to Vercel.