Developer Experience
How to Create Developer Screencasts with Keynote
Updated:
In this article, I will show you how I create screencasts for developers using Keynote.
I use a Mac, so all of the information and software mentioned in this article will be specific to Mac.
Screencast Examples
Before explaining the methods, tools, and techniques I use to create these screencasts, I thought it would be helpful to share a few examples. Please watch them to determine if this is something you are interested in learning more about.
Now that you have seen a few examples let’s break down the steps involved in creating them.
Writing the Script
The first thing I do is write the script that I will read when recording the screencast. A script helps me clarify my thoughts and serves as an outline of all the topics I wish to discuss. Writing is thinking aloud, so by having a script, I am confident that I won’t forget something or leave a critical point out.
One of the nice things about having a script is that you know precisely what you will say. Improvising or “just winging it” often wastes a lot of time and makes editing more difficult.
Once the script is complete, I split the script into multiple parts or sections. Each section will be a separate video. I do this because it allows me to record most of the videos in a single take, which is more natural. I do not enjoy editing videos, so anything I can do to minimize it is better.
Example Script
In the video below, I broke the script into nine different sections.
Here is what the script looks like:
You can click on the image to see a larger version.
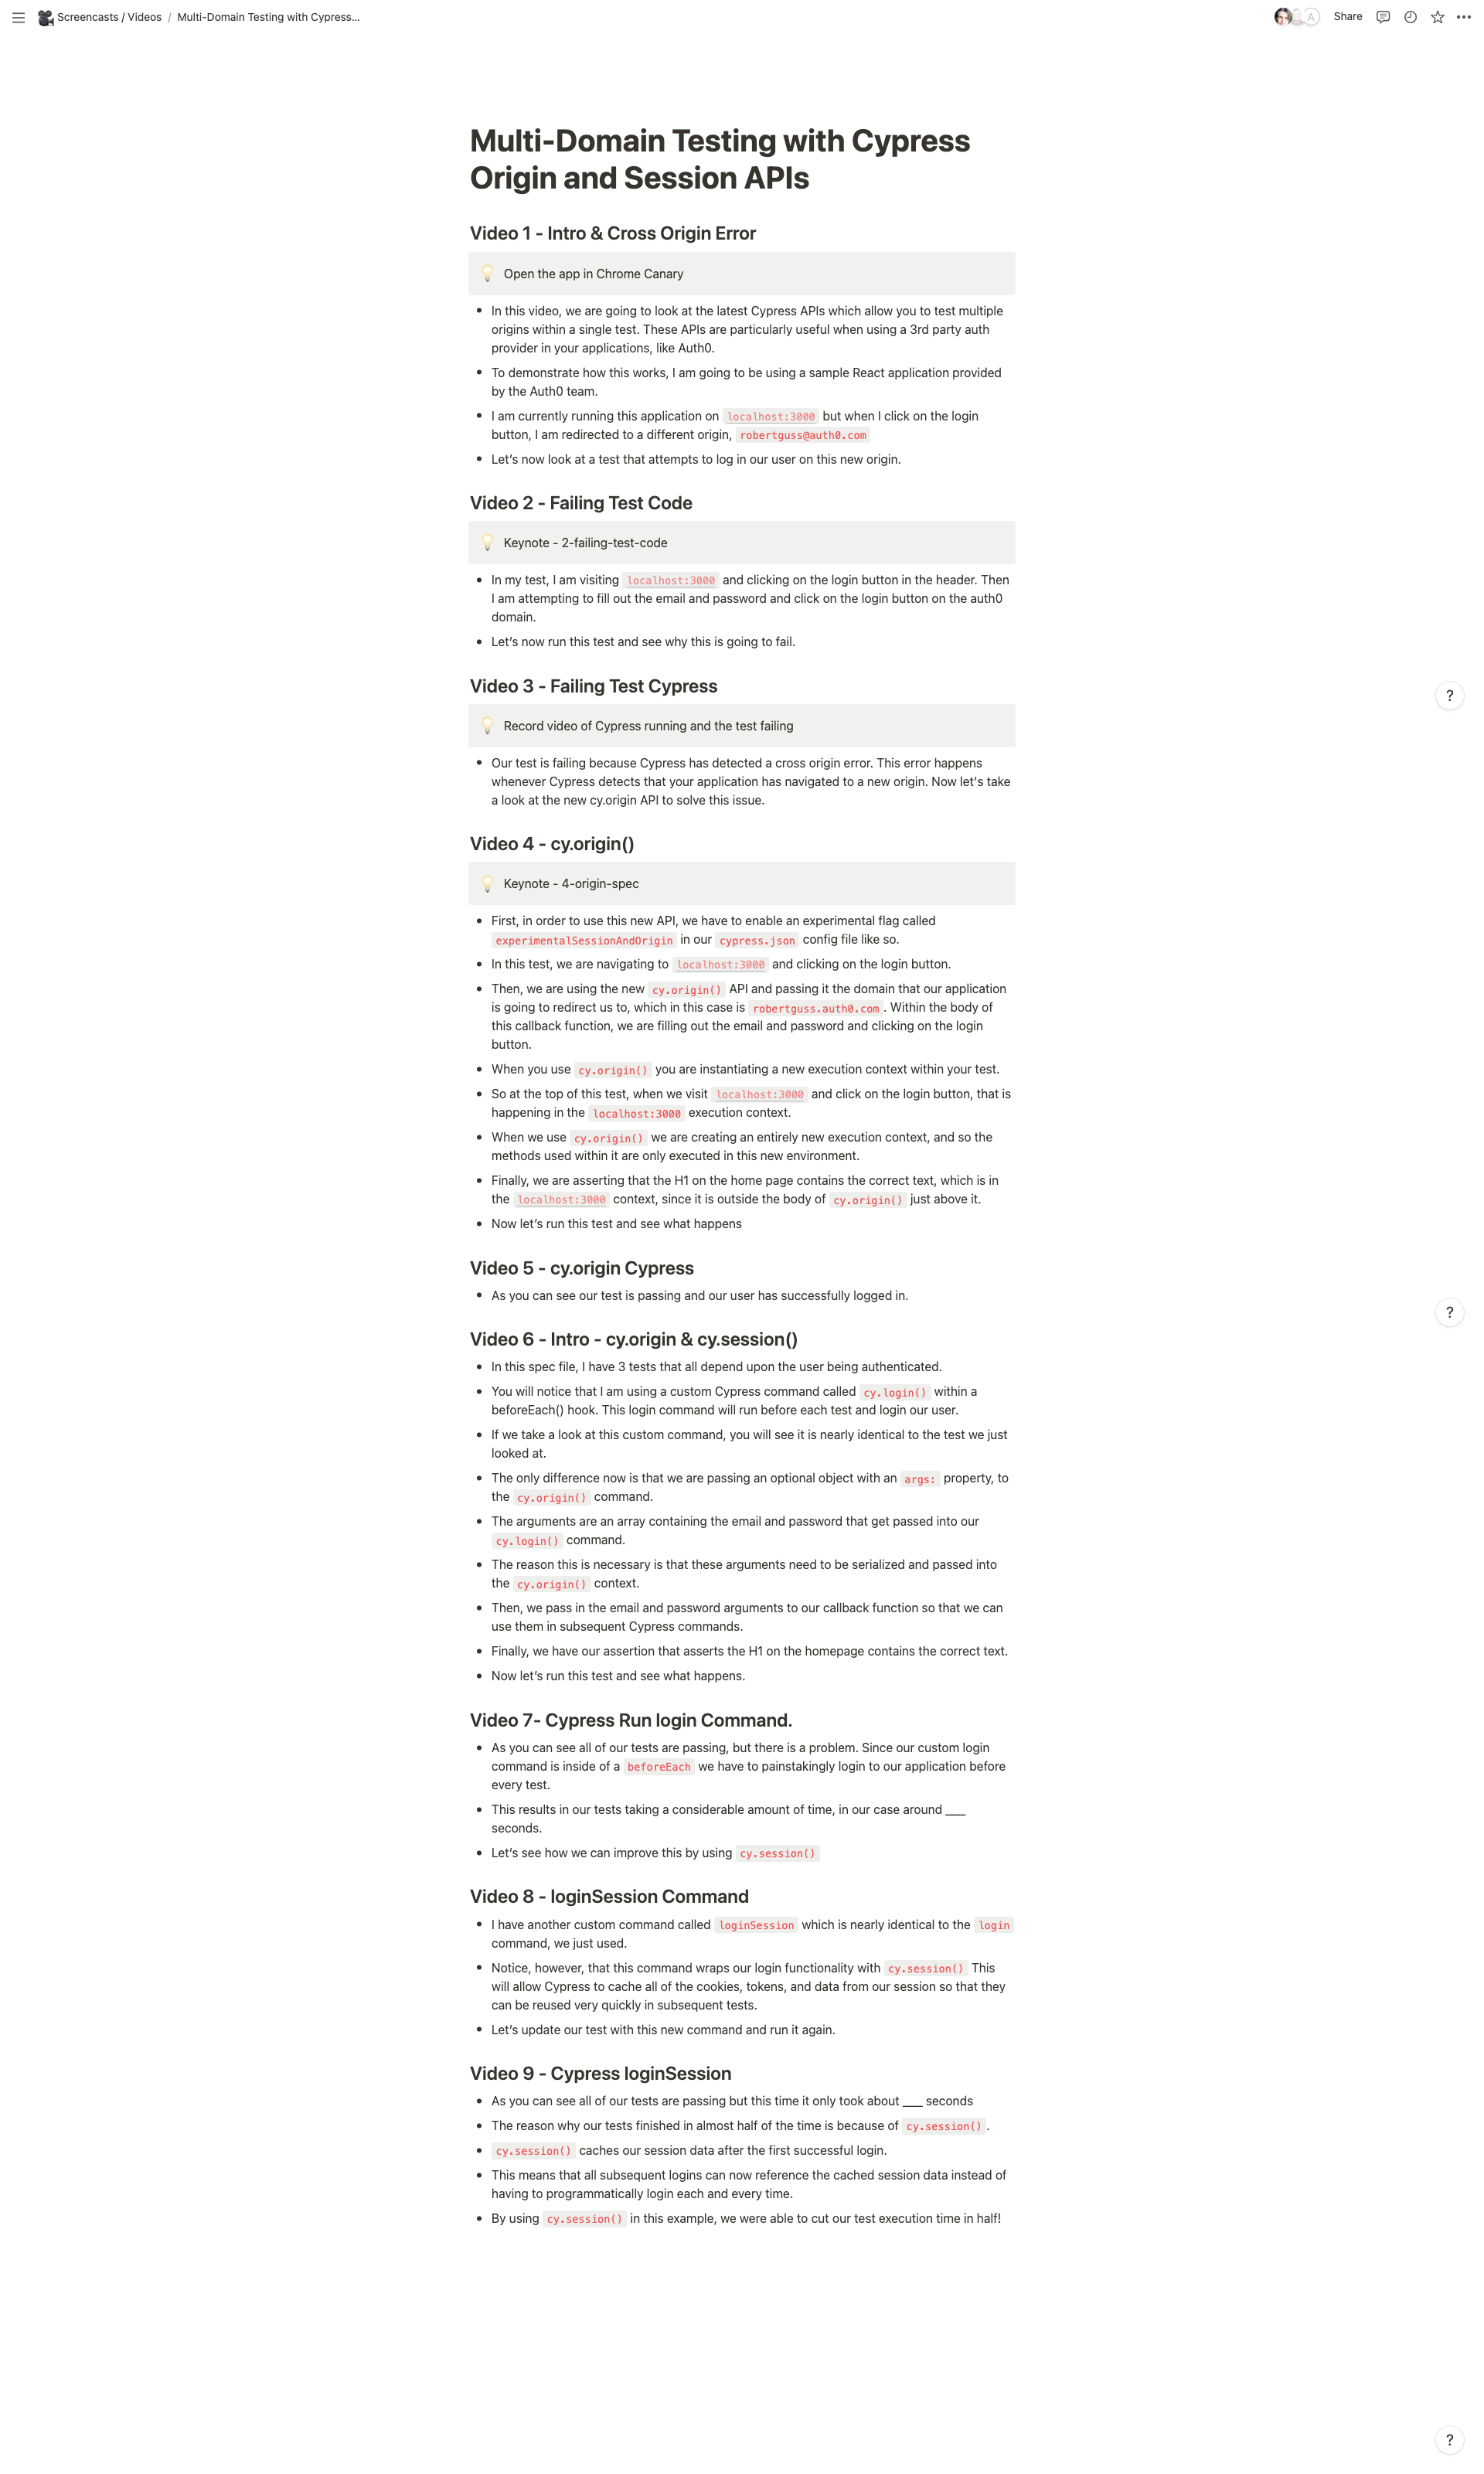
I use Notion for all of my scripts. One of the nice things about using Notion is that it allows me to drag and drop sentences and ideas around as I shape the script. I also like it because it keeps everything in sync across all of my devices, as I usually read the script from my iPhone or iPad while recording. Keynote blacks out all external monitors while presenting, so I use my phone or iPad instead.
I will often make notes for myself within the script to remind myself of things I need to do. For example, I will often remind myself of the name of the keynote file I need to use for that section, when I need to advance the next slide, etc.
Once the script is complete, I then begin working on the slides.
Creating the Slides
This is the most time-intensive part of the process, especially if you are new to Keynote. Since I am making screencasts for developers, I will often have many code examples.
Highlighting & Animating Code Examples
One of the main reasons I like using Keynote for code examples is that I can highlight and draw the viewer's attention to specific areas or lines in the code. I learned this technique from the guys over at Egghead.io. They have an excellent video that goes in-depth on how to highlight and animate code here.
Animations with Keynote
Keynote also contains an incredibly powerful animation engine that allows you to create animations with relative ease. The most important animation tool within Keynote that you want to learn is “Magic Move.” You can find out more about how to create animations in Keynote from this awesome video by Sam Julien.
You can also “reverse engineer” the animations in the slides I used in the example videos above to better understand how to create animations in Keynote. Here are links to download the keynote files.
DX-Template-for-Screencasts.key
The first file, “DX-Template for Screencasts,” contains several template slides that I use regularly. It includes slides that mimic a terminal, VSCode, etc., so I don’t have to reinvent the wheel. Feel free to use these in your videos if you like.
Audio & Mics
Audio is one of the most important aspects of making videos, not just screencasts but any video. People can put up with a lower quality resolution, but they will NOT tolerate lousy audio, so getting your sound right is critical.
I use the Blue Yeti microphone, and it works pretty well. The problem with using it or any condenser microphone is how sensitive they are. Unless you are in an acoustically treated room, they will pick up all kinds of sounds and vibrations around you. If you don’t already own a mic, I recommend you use the Samson Q2U, a dynamic microphone that sounds excellent. Dynamic mics are less sensitive than condenser mics, so you won’t have to worry as much about room sounds or sounds outside of our room like lawnmowers, leaf blowers, cars, etc.
Regardless of the mic, it would be best to get your mouth as close to it as possible. You want the mic as close to your mouth as possible for the best quality sound.
You may also want to invest in a pop filter to protect your mic from picking up explosive sounds like when you make “p” sounds or “s” sounds with your voice.
If you don’t already have a mic, make sure to buy one that you can hook up to your computer via USB. Otherwise, you will have to purchase mic cables and an audio interface to hook up the mic to your computer, which is frankly overkill and unnecessary for screencasts. I have been a musician for over 20 years and already own a bunch of audio equipment, and I still use a mic with a USB connection for its convenience and because the audio quality is just as good.
Recording
Now that the script and the slides are complete, it is time to record. I use Screenflow to record all of my screencasts. I also use a tool called SwitchResX, which allows me to change the resolution of my monitors to whatever I want. Being able to control the resolutions of my monitors is essential for making screencasts. I always record at the following resolution.
1280x720, 60Hz HiDPI 16:9
This will record at 720 but with double the number of pixels, so when I later export from Screenflow, I can export at double the resolution. Recording at 720 makes everything large enough, and the HiDPI resolution provides plenty of pixels, so everything is crisp and clear.
When I am about to record, I press play in Keynote to start the presentation, and then I press my keyboard shortcuts to start the Screenflow recording and record the video.
I name each file for each video something like “video-1.screenflow", “video-2.screenflow,” etc. The numbers correlate to the numbers in my script, like in the example above.
Making Mistakes
It would be best if you accepted that you will make mistakes and say stupid things when recording. This is normal and will improve over time with lots of practice. What I like to do when I say the wrong thing, cough, breathe loud, etc., is to take a long pause while still recording and say that sentence or part over again. I rarely ever stop the recording, as I can edit and delete all the bad takes afterward.
Another important thing to note is that once you have finished recording the video, watch the entire thing immediately afterward to make sure you have all that you need. I used to record all of the sections without immediately reviewing them, only to find out that my audio was terrible or something else and had to re-record everything. Please don’t make the same mistakes as me. So once you have finished recording, make sure to watch and listen to it immediately to ensure everything looks and sounds good, then move on to the next video.
Editing
Now that you have recorded all of the sections of your video, you need to start editing. Open the first video and immediately save it as “video-1-edited.screenflow” or something similar. I always immediately save a copy and denote “edited” in the file name. This way, I have a copy of the original unedited version and the edited version. I do this because sometimes I make bad edits or mistakes that I cannot undo. I cannot tell you how many times I have done this and had to redo the recording again. This way, you will have a copy of the original to revert to if you make a mistake during the editing process.
I would highly recommend you do this, especially if you are brand new. You will thank me later.
I can’t go into great detail on how to edit videos in Screenflow. There are tons of helpful videos on YouTube that will help you, but for the most part, it is very straightforward. You don’t need to know a whole lot, just the basics like how to cut, trim, transition, etc. Screenflow makes all of this very easy for you.
The first thing you need to do is create a new ScreenFlow project that contains all of your videos. I typically duplicate the “video-1.screenflow” file and rename it to the name of the screencast, like “cypress-origin-api.screenflow.” Then I open each screenflow project, copy the audio and video tracks and paste them into the “cypress-origin-api.screenflow” project, or whatever you named your project. After going through each one, you should have all the video and audio tracks combined into a single ScreenFlow project.
Next, before I start editing, I adjust the audio. Take a look at this screenshot.

You want to select all of the audio tracks and then click on the speaker icon in the right sidebar. Check the “Smooth Volume Levels” checkbox and the “Remove Background Noise” checkbox. You can adjust how much background adjustment is necessary with the slider below it. This will help to make your audio levels sound consistent.
After adjusting the audio, I begin to trim, edit, delete, etc.
Ripple Delete
One technique that is a game-changer for editing in Screenflow is something called Ripple Delete. It will significantly cut down the amount of time you spend editing.
You can watch this video to learn it: How to Ripple Delete.
Recut
Another tool that I have heard a lot of great things about, but have yet to use myself is Recut. Check it out and see if it helps you.
Descript
Another tool we use a lot at work is called Descript. It is a great tool for editing and collaborating on screencasts. What makes it really powerful is the ability of its AI to learn your voice. This allows you to easily fix misspoken words, sentences, phrases, etc. All you have to do is highlight that word(s) in descript, type out the correct word(s) and Descript will use your own voice to correct it. It sounds incredibly realistic.
A tool like this is by no means essential, but it does come in handy. It is worth looking into if you are going to be making a lot of screencasts.
Exporting
Once you are finished editing and are satisfied with the screencast, it is time to export. Here are the settings I use when exporting.

Make sure you select the “Type: Manual” and select the “customize” button. Here are the custom settings I use in that menu.
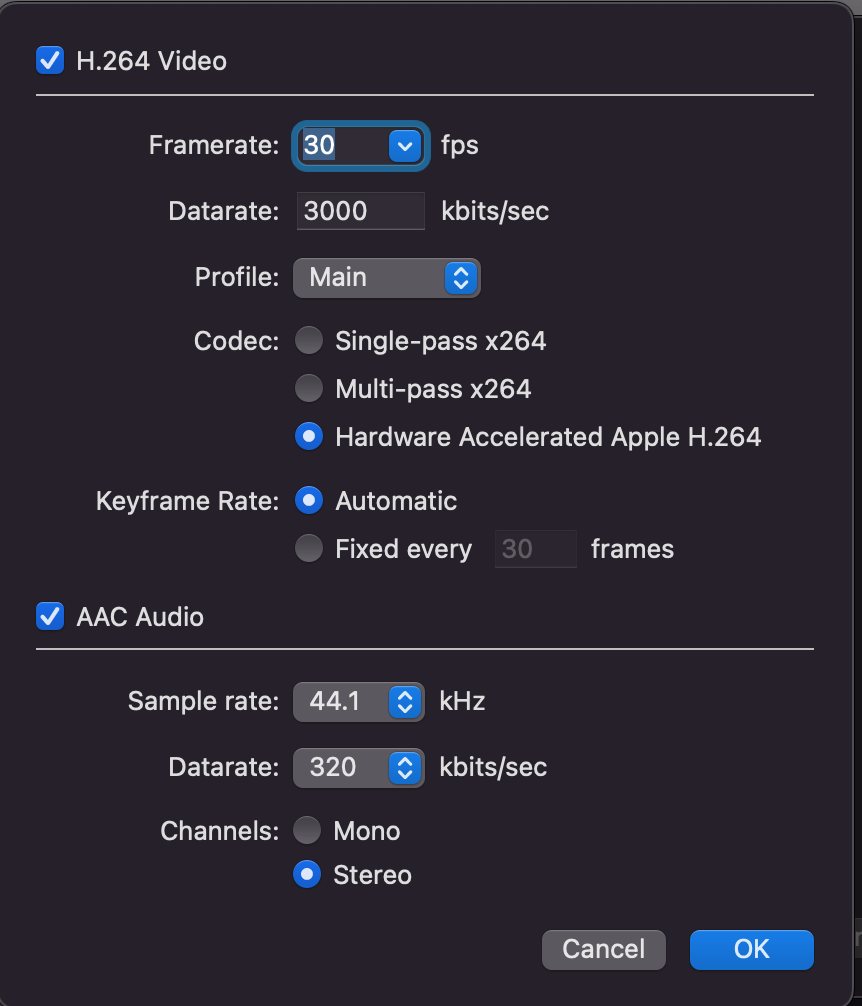
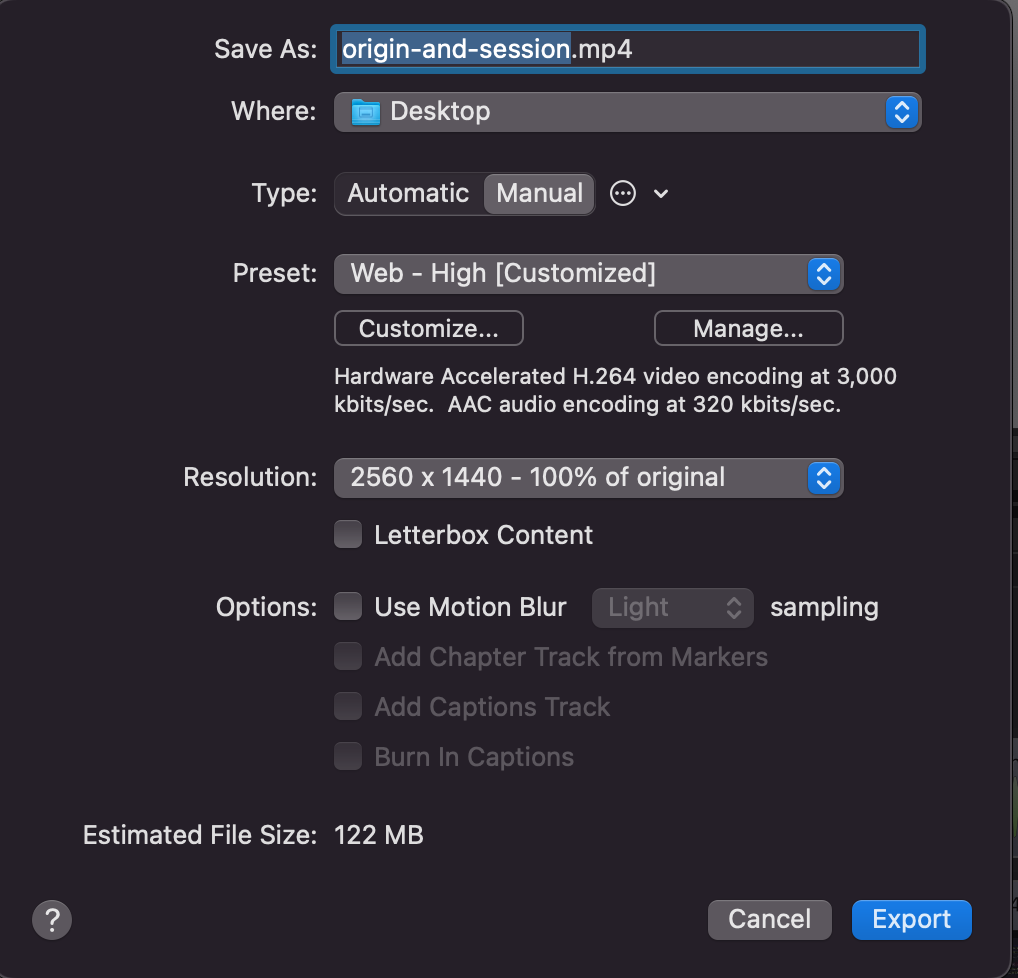
Notice that the resolution is set to 2560x1440, which is 100% the original. I record at HiDPI because it gives you double the number of pixels.
I also always uncheck the “Letterbox Content” checkbox.
Finally, click “Export.”
Summary
This article went over how I create developer screencasts with Keynote. I tried to be as detailed and specific as possible, as the devil is really in the details with this kind of thing. If you found this helpful and use any of these ideas or techniques in your screencasts, I would love to see them. Please share them with me on Twitter or send me an email. All of my contact info is in the footer.